AI Workflow Overview
Build a game by describing it.
This guide takes you from an empty project to a deployed game without placing a single node by hand, without writing the JavaScript, and without drawing the art. You describe what you want in plain language; the AI does the building.
There are two routes through XGENIA. The Workflow Overview is the manual one — you place and wire every node yourself. This page is the other one.
AI Agents is in early alpha. It requires XGENIA Pro and your own OpenRouter API key. Screens change often.
What you need to know before starting
Very little about XGENIA itself.
You do not need to know what a node is, how signals connect, which component a page lives in, how to write a JavaScript function node, or how to draw a spin button. Every one of those is something the AI does and can explain afterwards if you are curious.
What you do need is to know what game you want. The AI will build whatever you describe, quickly and without arguing — which means a vague description gets you a vague game. "Make a slot game" produces something generic. "A 5×3 slot with a candy theme, a spin button that disables while the reels are turning, and a balance that goes down on each spin" produces what you asked for.
So the skill this guide teaches is not XGENIA. It is describing a game precisely enough to be built, then checking what came back.
| You bring | The AI brings |
|---|---|
| What the game is and how it should behave | Components, nodes, wiring, JavaScript |
| Judgement on whether it looks and feels right | Art, animation, sound, layout |
| Decisions when there is a real choice to make | Debugging, verification, deployment |
The shape of it
Fifteen steps, in three phases. Setup is done once per project; the build loop is where you spend your time.
| Phase | Steps | What happens |
|---|---|---|
| Set up | 1–7 | Create the project, open the panel, connect a model, add your keys, write your standing rules, and confirm the AI can read your project |
| Build | 8–12 | Scaffold the game, build the screens, wire the logic, generate the art, finish the assets |
| Ship | 13–15 | Make it verify itself, checkpoint, deploy |
If you have already set up once, start at Step 8.
Step 1 — Create a new project
Launch XGENIA. You land on the project browser — Recent projects, with New project and Open folder in the top-left.
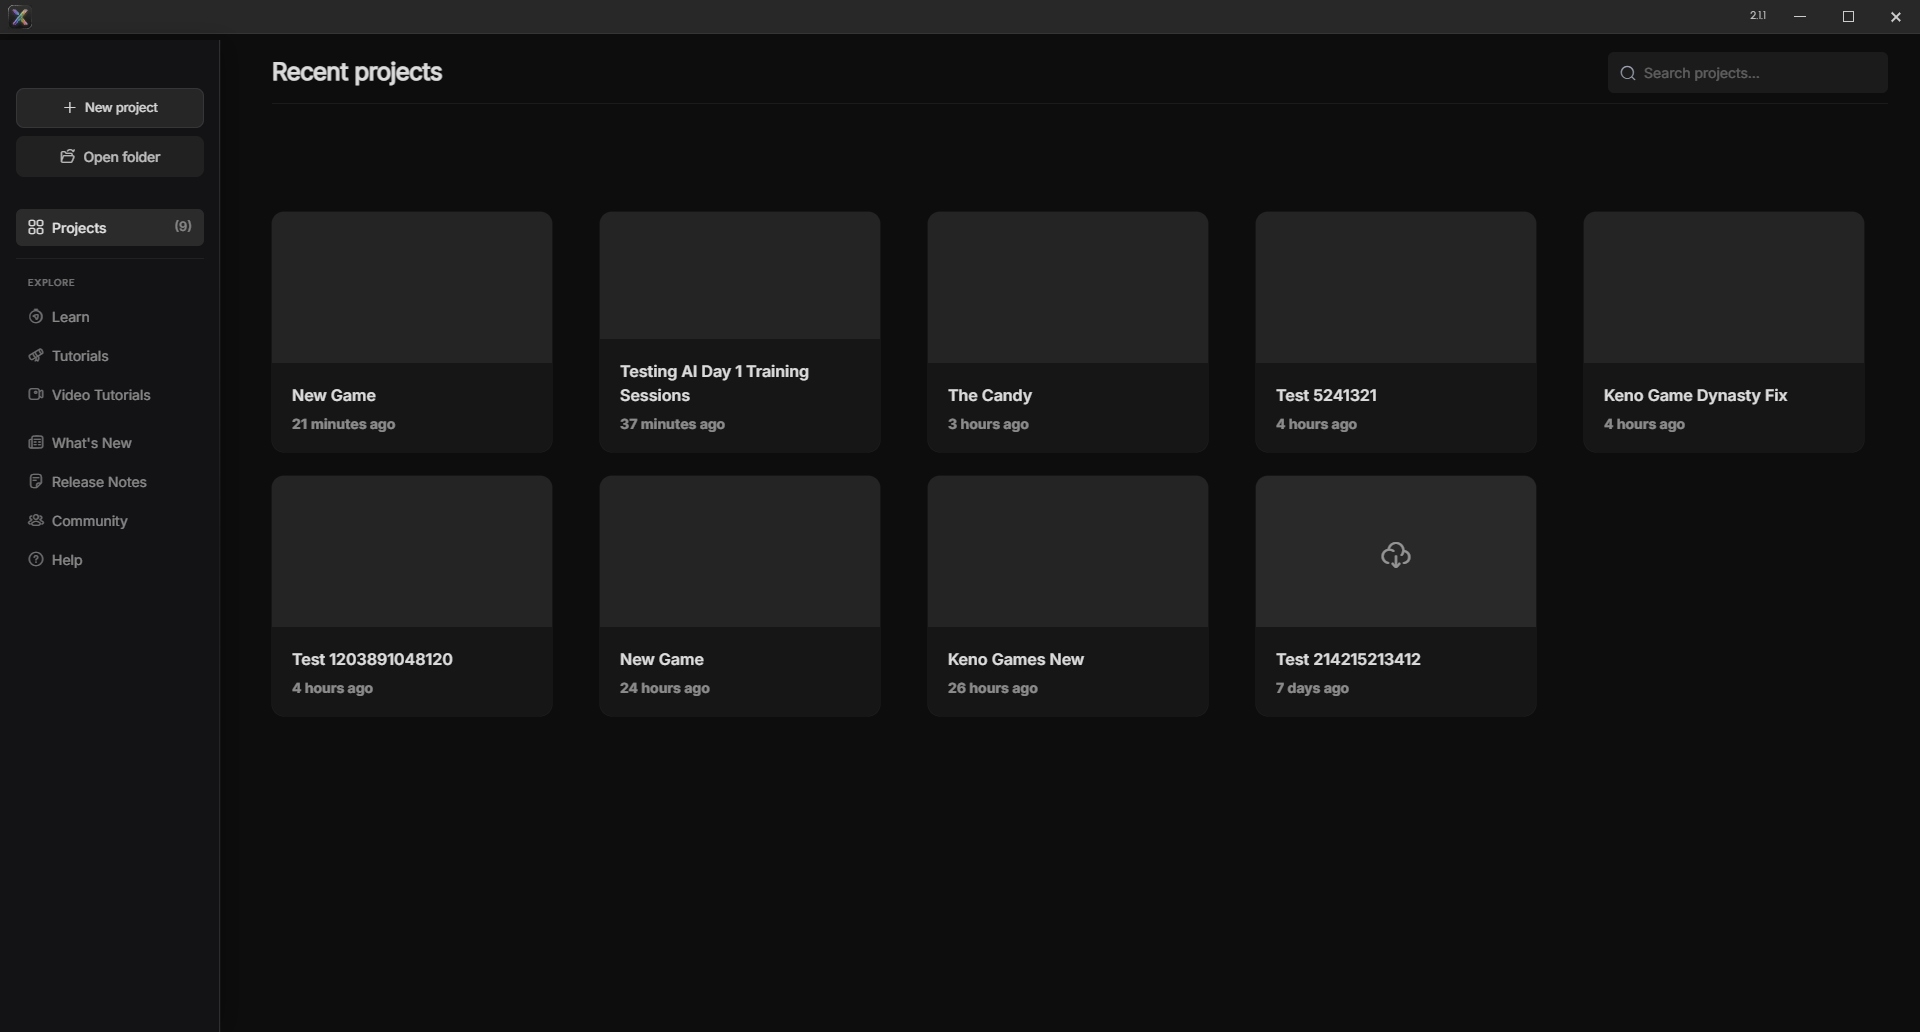
Click New project and XGENIA asks how you want to start.
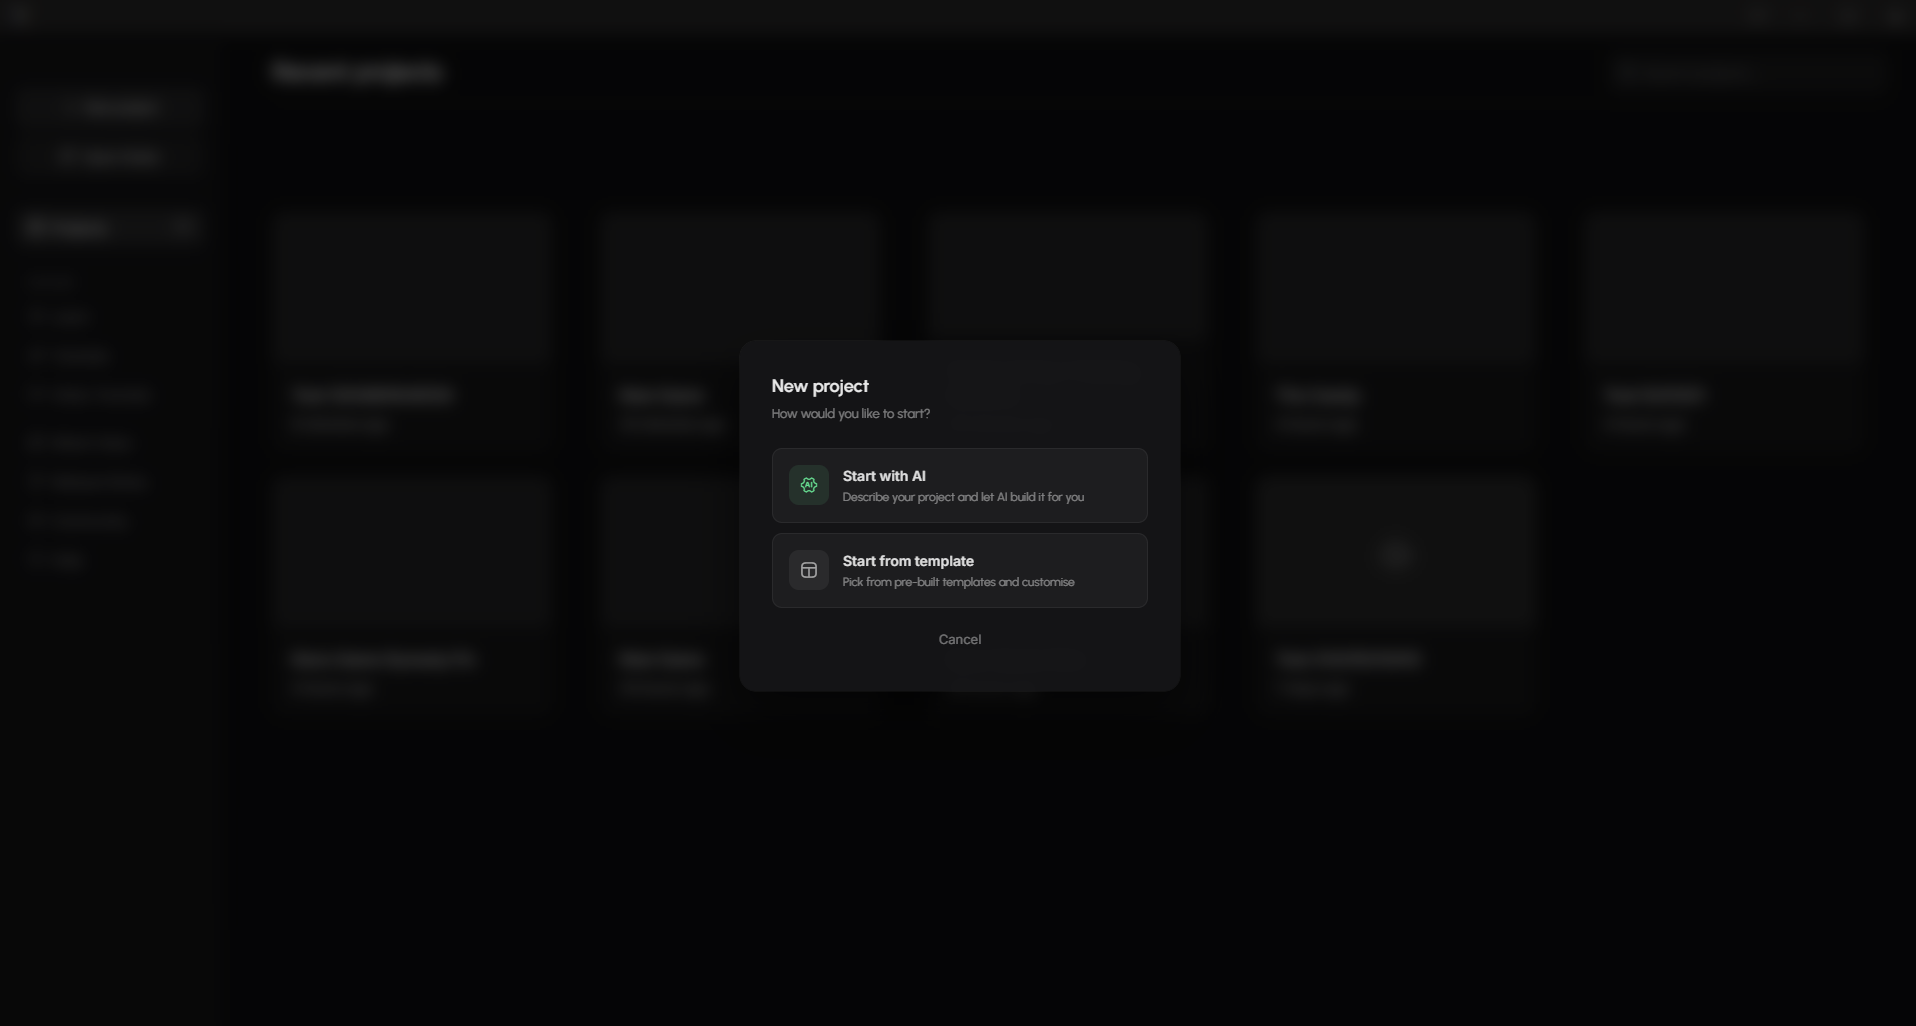
| Choice | What it does |
|---|---|
| Start with AI | Creates an empty project and drops you straight into it with the chat panel ready. Nothing exists yet — you describe the game and the AI builds it from nothing. |
| Start from template | Opens the template list, so you begin with a working project and change it. |
Both land in the same editor. The difference is only what is on the canvas when you arrive.
Which one should you pick?
Start with AI if you know what you want to build and would rather not unpick someone else's structure. This is the route the rest of this guide assumes.
Start from template if you want something running in front of you first.
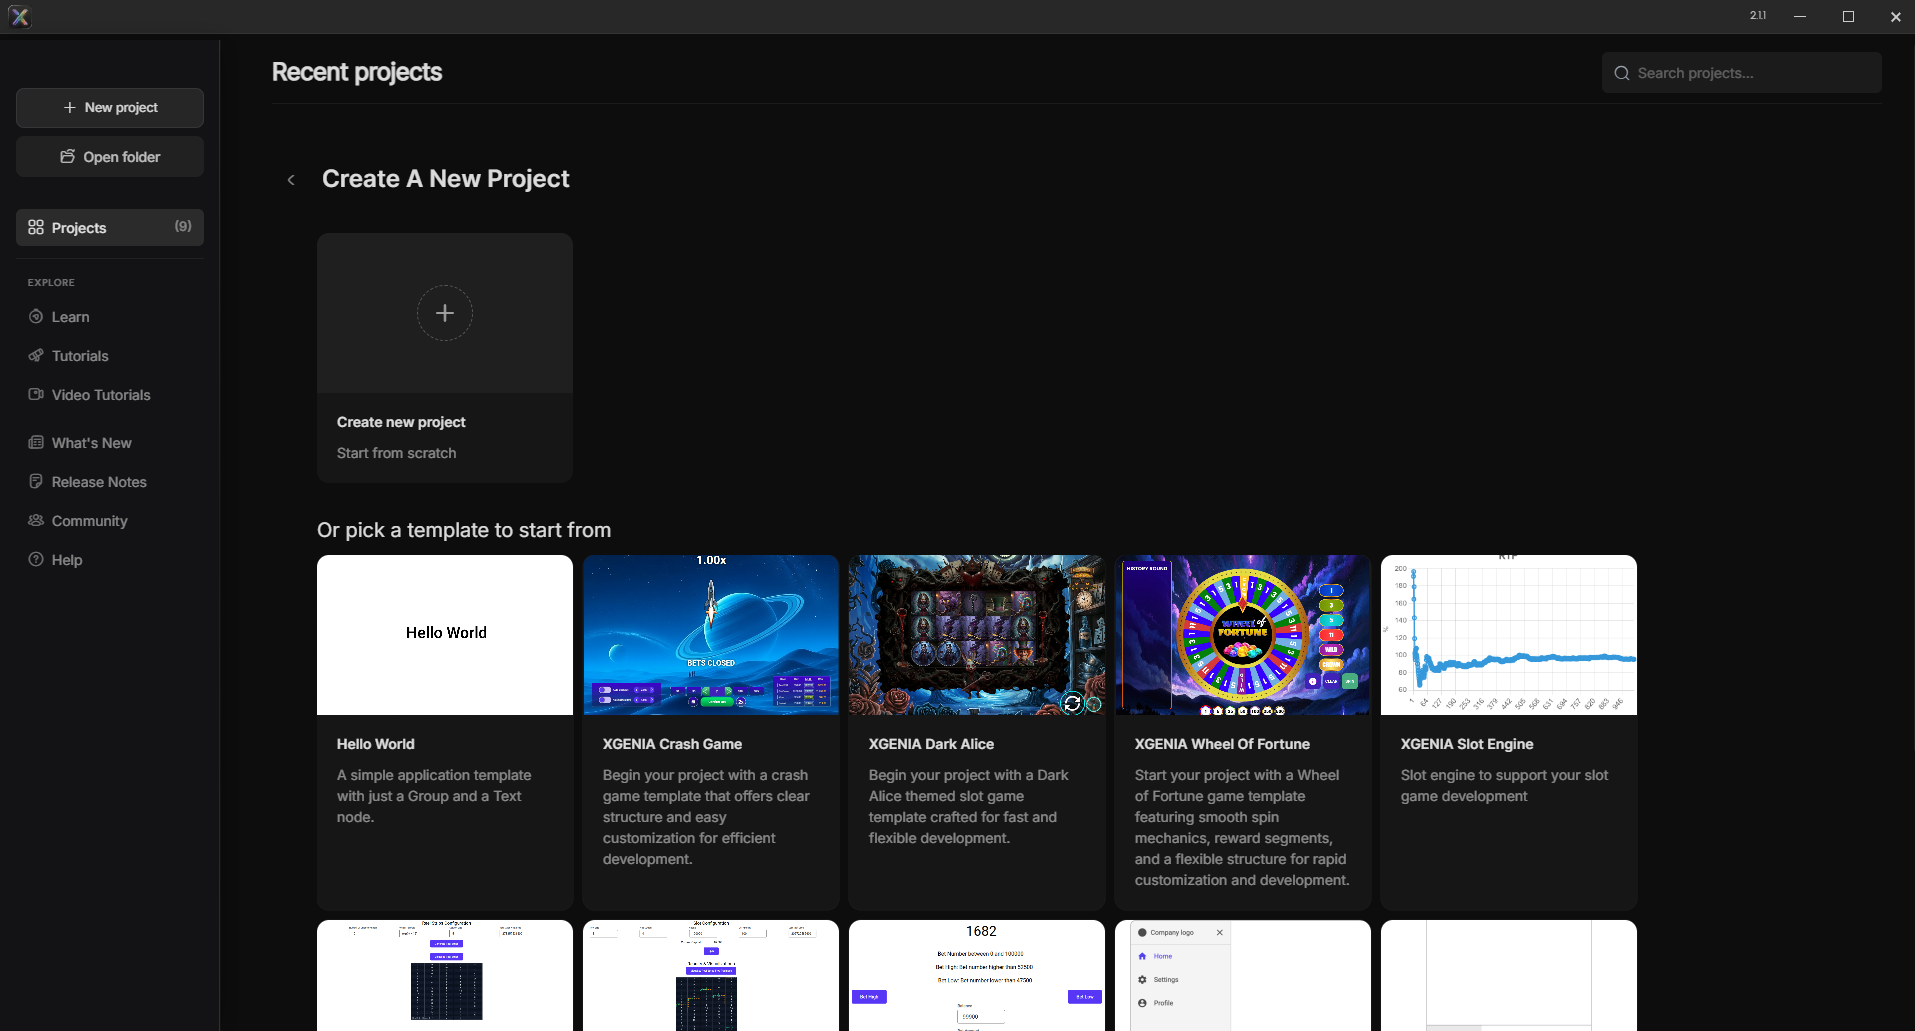
The picker opens on Create A New Project. At the top is Create new project — start from scratch, and under Or pick a template to start from sits the template library: Hello World, XGENIA Crash Game, XGENIA Dark Alice, XGENIA Wheel Of Fortune, XGENIA Slot Engine and more below.
For learning this workflow, pick Hello World — "a simple application template with just a Group and a Text node". It is the smallest thing in the list, which is the point: when the AI makes its first change you can see exactly what changed, with nothing else in the way.
The game templates are the better starting point once you know the loop. A Crash Game or Slot Engine template already has working mechanics, so you spend your prompts on theme and feel rather than on structure.
Whichever you choose, the AI can read and rewrite what is there. A template is a starting point, not a commitment.
Step 2 — Meet the editor
The project opens. Components on the left, the viewport at the top, and the node canvas below it.
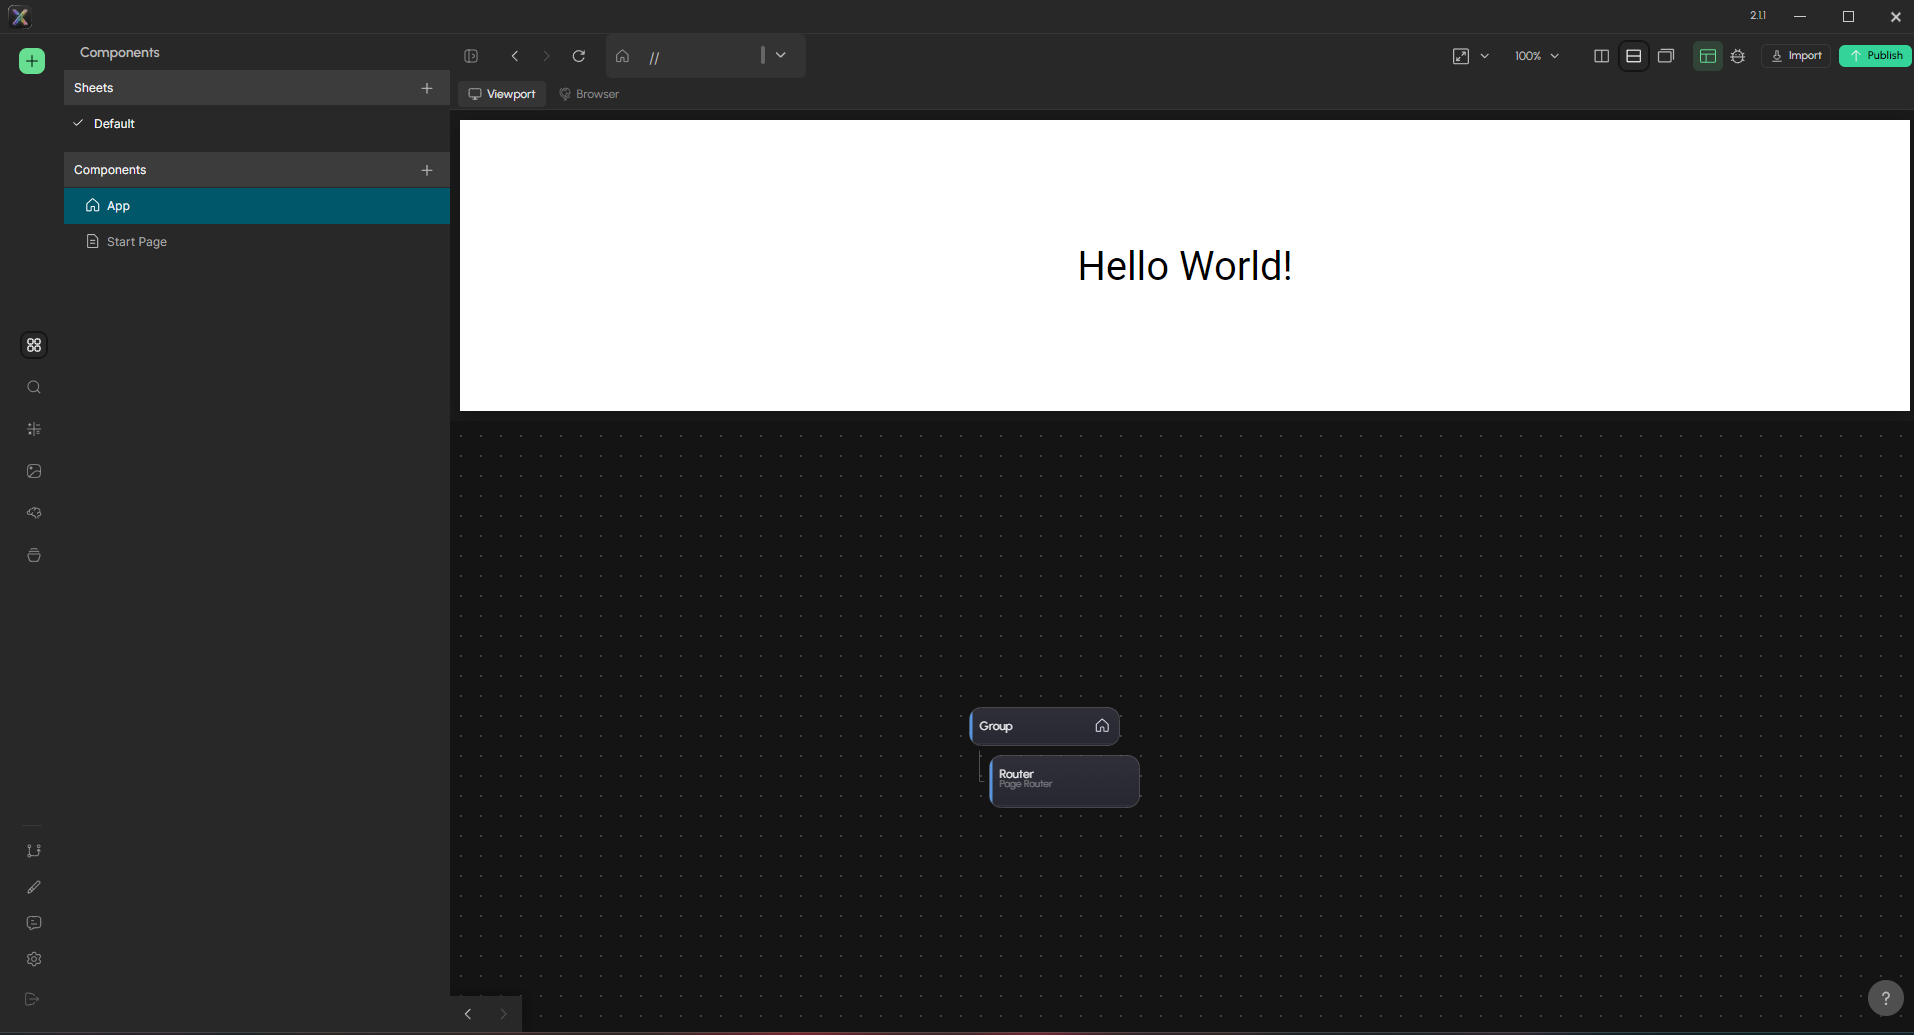
Above is the Hello World template. The viewport shows what the app renders — the words Hello World! — and the canvas below shows what produces it: an App component holding a Group and a Router, with a Start Page beside it in the Components list.
That is the whole project. Two components, two nodes. Small enough that when the AI changes something you can see exactly what changed.
If you chose Start with AI instead, the canvas is nearly empty: one /App component with a single Group node, and nothing in the viewport yet.
Either way, you are not going to touch this canvas by hand.
Down the far-left rail are the editor's panels. Reading top to bottom: Components, Search, Maths RGS, AI Image Editor, Chat, Assets — then, lower down, Version Control, Project Styles, Feedback and Settings.
Step 3 — Open the Chat panel
Click the Chat icon in the left rail. The panel docks where the Components panel was, so it stays open beside your canvas while it works — you watch nodes appear in real time.
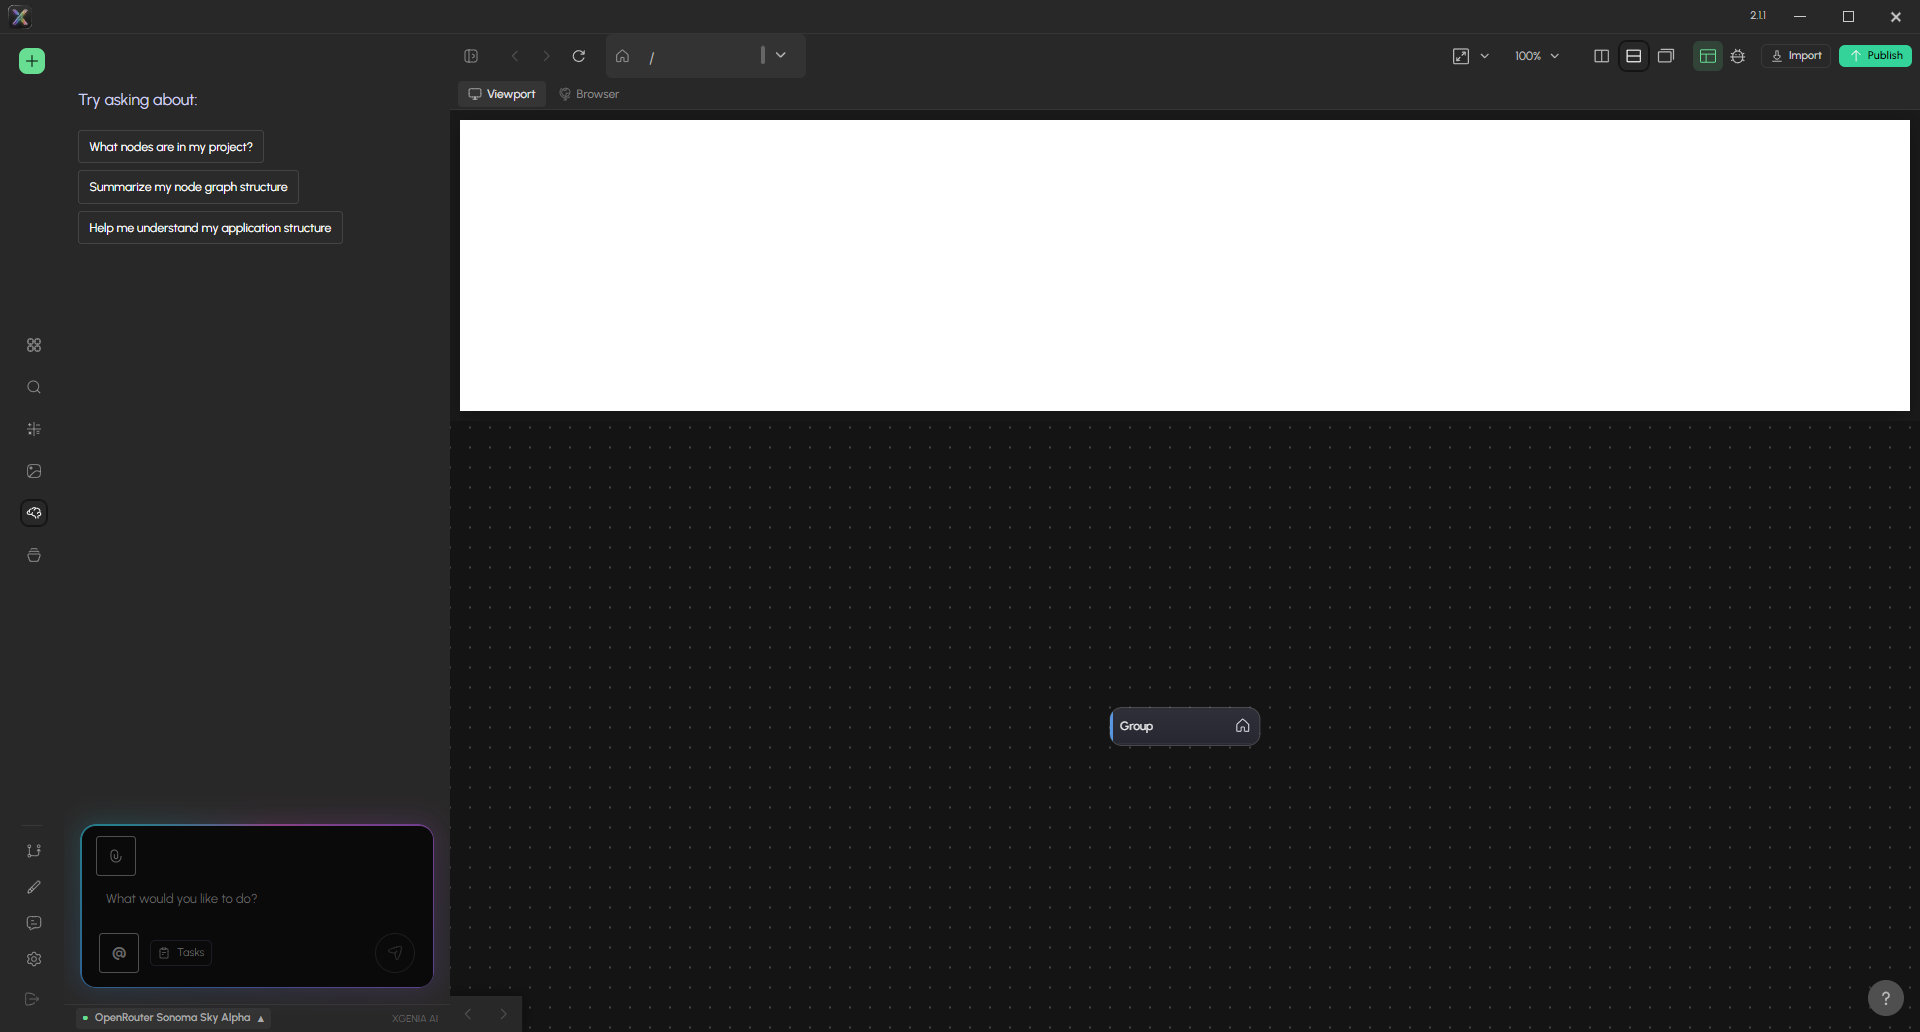
What you get on a fresh panel:
- Suggestion chips — What nodes are in my project?, Summarize my node graph structure, Help me understand my application structure. Safe read-only prompts, useful for confirming the AI is actually wired to your project.
- The input box — "What would you like to do?", with a paperclip for images, an @ button for mentioning nodes, and a Tasks button.
- The model bar at the very bottom — the active model with a status dot: green when your API key is verified, red when it is not.
If you see an upgrade prompt instead of the chat, your account is not on Pro. If you see a sign-in form, sign in with your XGENIA account.
Step 4 — Connect a model
Hover the panel to reveal its header icons, then click the gear (Provider & Tools). The AI Settings window opens over the editor.
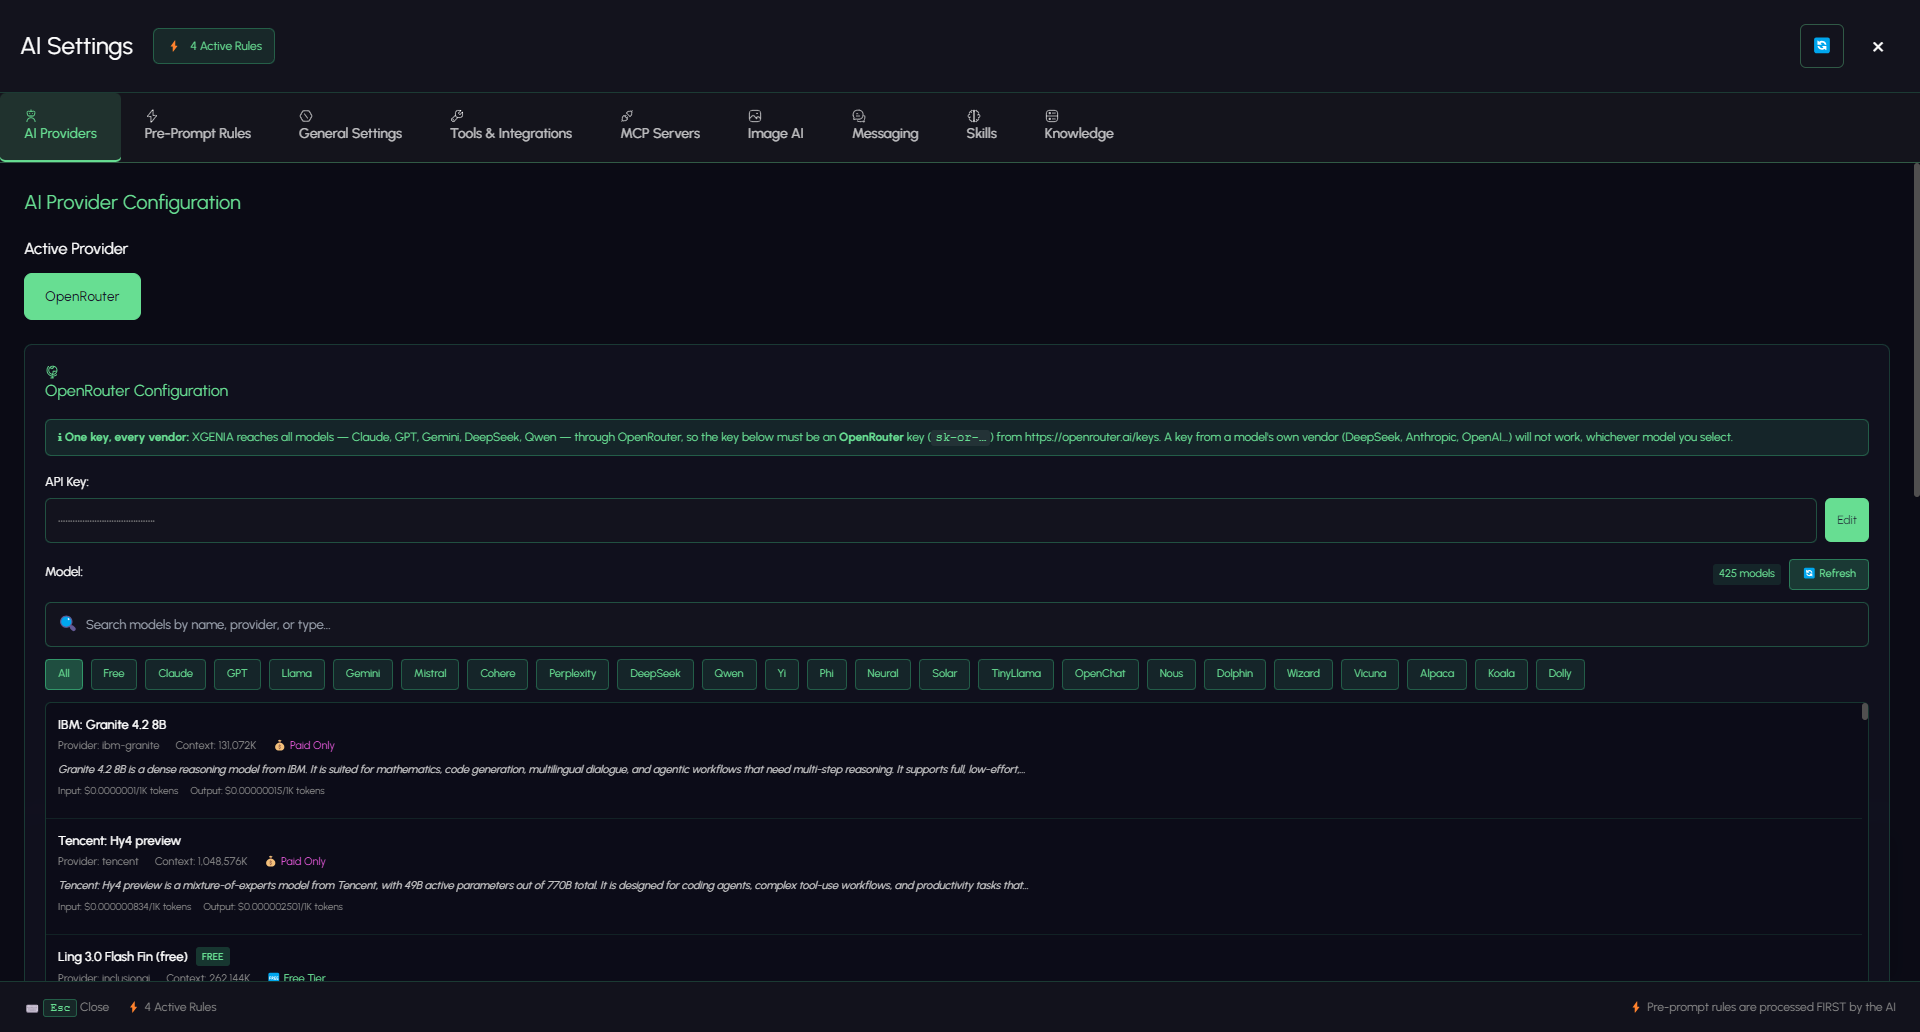
On the AI Providers tab:
- There is exactly one provider — OpenRouter. XGENIA reaches every model through it, so you need one key, not one per vendor.
- Paste your key into API Key. It must start with
sk-or-and come from openrouter.ai/keys. A key issued by Anthropic, OpenAI or DeepSeek will be rejected whichever model you pick. - The catalogue loads — several hundred models, live from OpenRouter.
Find a model with the search box or the family chips (All, Free, Claude, GPT, Gemini, DeepSeek, Qwen, and more). Each card shows its provider, context length, a FREE / Free Tier / Paid Only badge, and input/output cost per 1K tokens.
Which model? Building in XGENIA is a long tool-calling session, not a single question — the model has to hold a plan across dozens of steps, read a node graph, and notice when its own change broke something. Use a top-tier reasoning model for real work. Free models are fine for poking around and will lose the plot on anything complex.
Sub-agents
Scroll down the same tab. Two specialists sit behind the main model and are dispatched automatically.
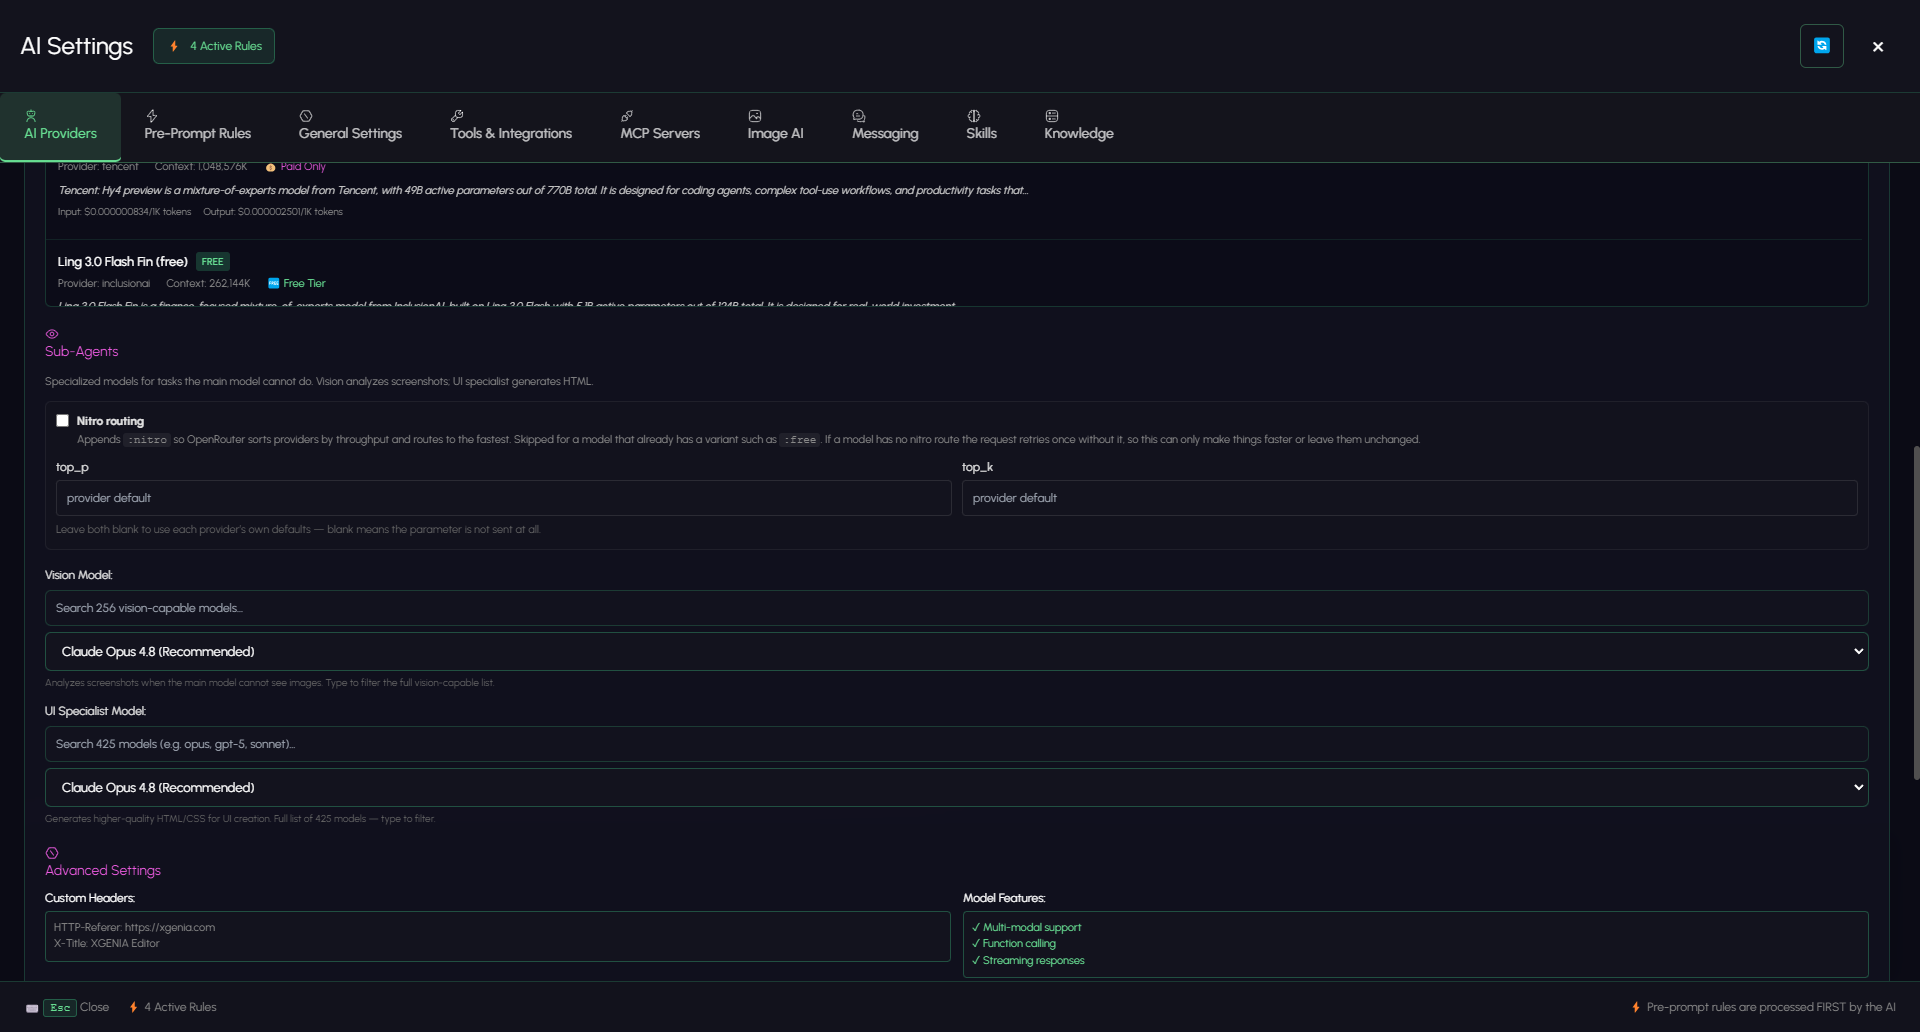
| Setting | What it does |
|---|---|
| Vision Model | Looks at screenshots and reports what is actually on screen. Only vision-capable models are listed. |
| UI Specialist Model | Generates higher-quality HTML/CSS for UI creation, which is then translated into XGENIA nodes. Set to None to disable. |
| Nitro routing | Appends :nitro so OpenRouter routes to the fastest provider. If a model has no nitro route the request retries once without it — so it can only help or do nothing. |
| top_p / top_k | Leave blank. Blank means the parameter is not sent at all, and each provider's own defaults are tuned for tool calling. |
The vision sub-agent is worth setting up properly: it is what independently checks the main model's claims about what it built.
Step 5 — Write your standing rules
Do this before your first build prompt, not after the third argument about spacing.
Switch to the Pre-Prompt Rules tab. These are instructions prepended to the system message in every conversation — the footer says it plainly: pre-prompt rules are processed FIRST by the AI.
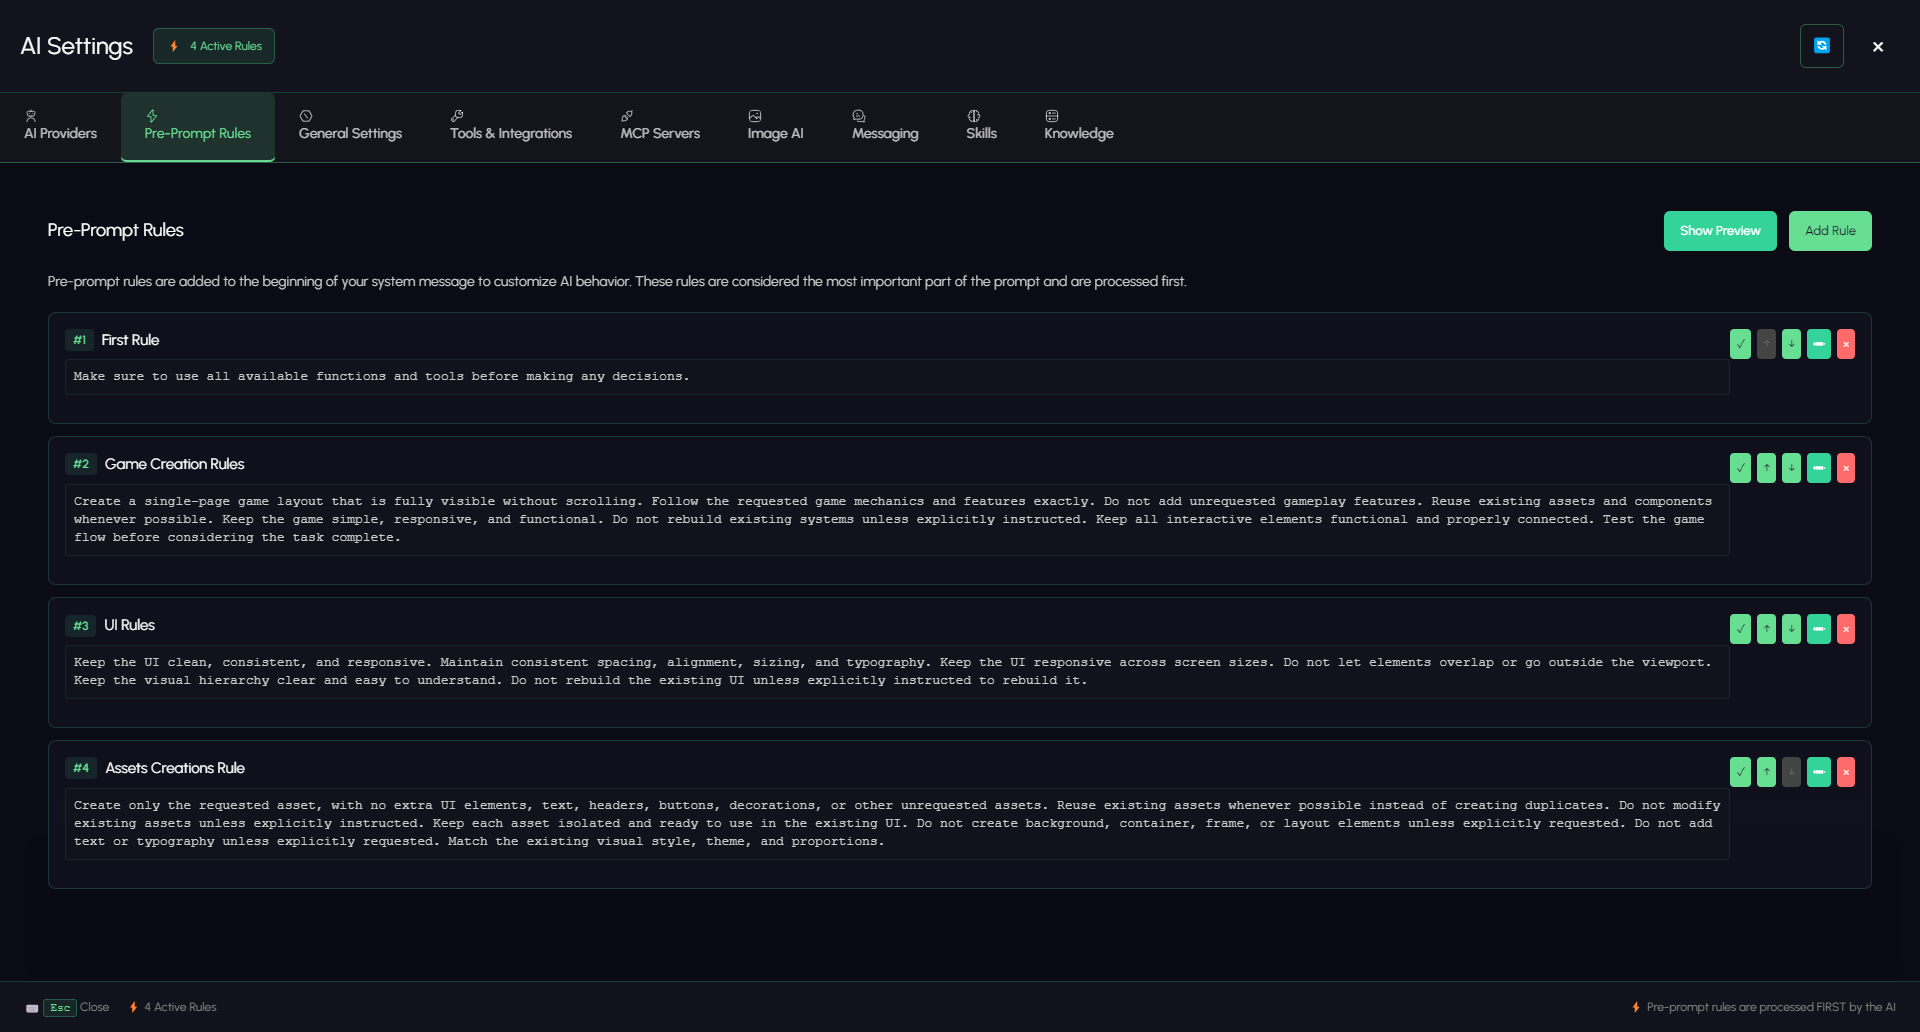
Rules are numbered cards. Each has an inline text area you edit in place, and controls on the right to toggle it active, move it up or down the order, or delete it. Add Rule creates a new one; Show Preview renders the exact block that will be prepended.
Rules that earn their place describe a standard, not a task:
Name: UI Rules
Keep the UI clean, consistent, and responsive. Maintain consistent
spacing, alignment, sizing, and typography. Do not let elements
overlap or go outside the viewport. Do not rebuild the existing UI
unless explicitly instructed to rebuild it.
Name: Assets Creation Rule
Create only the requested asset, with no extra UI elements, text,
headers, buttons, or decorations. Reuse existing assets whenever
possible instead of creating duplicates. Match the existing visual
style, theme, and proportions.
Notice the shape of both: they are mostly restraints. Left unbounded, an AI adds things you did not ask for. Most of the value in this tab is telling it what not to do.
A rule is silently skipped if it would break the assistant's ability to work at all — anything containing never use tools, skip tools, ignore tools, avoid calling, generic html, generic css, use bootstrap, or use tailwind. If a rule never seems to take effect, check for those phrases and rewrite it as a positive instruction about the result you want.
Press Esc to close AI Settings.
Step 6 — Add the other keys you will need
Your OpenRouter key covers the language model and nothing else. Two more keys live on the Tools & Integrations tab, and both are worth setting now rather than discovering their absence mid-build.
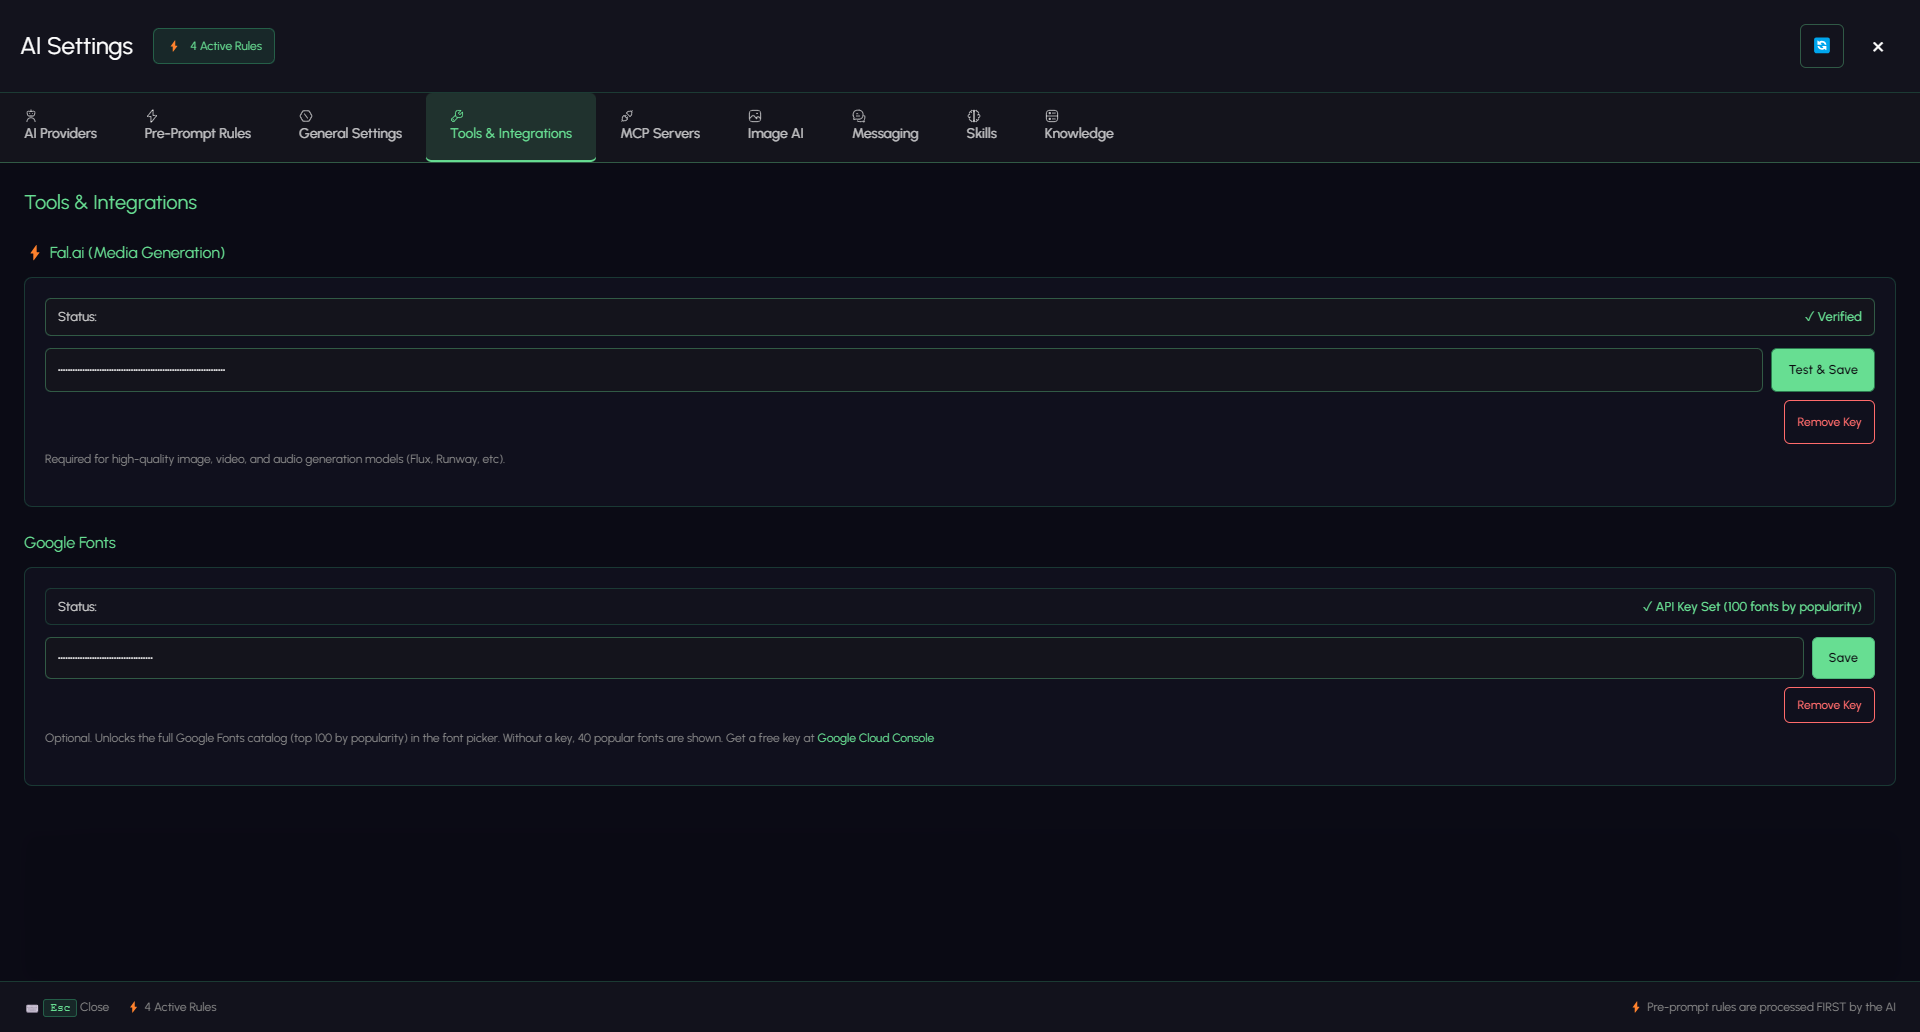
Fal.ai — required for any art
Everything the AI generates that is not text — images, video, audio — runs through Fal.ai. Paste your key and click Test & Save; the status line flips to Verified once it is checked against the service.
Skip it and asking for art fails or degrades badly — and that failure is easy to misread as the AI being poor at images rather than as a missing key. Billing is on your Fal.ai account, separate from OpenRouter.
Google Fonts — optional, cheap
Without a key the font picker offers a curated 40 fonts. With one, the top 100 by popularity from the full catalogue. Get a free key from the Google Cloud Console and click Save.
If the AI keeps reaching for the same handful of typefaces and none of them suit your design, this is usually why — it is choosing from 40 options, not thousands.
| Key | Required? | Unlocks |
|---|---|---|
| OpenRouter | Yes | The AI itself |
| Fal.ai | For art | Image, video, audio generation |
| Google Fonts | No | A wider font list |
| OpenAI Whisper | No | Telegram voice messages — see Messaging |
Full detail: Tools & Integrations.
Step 7 — Confirm the AI can see your project
Before asking it to build, ask it what it sees. Click the first suggestion chip, or type it.
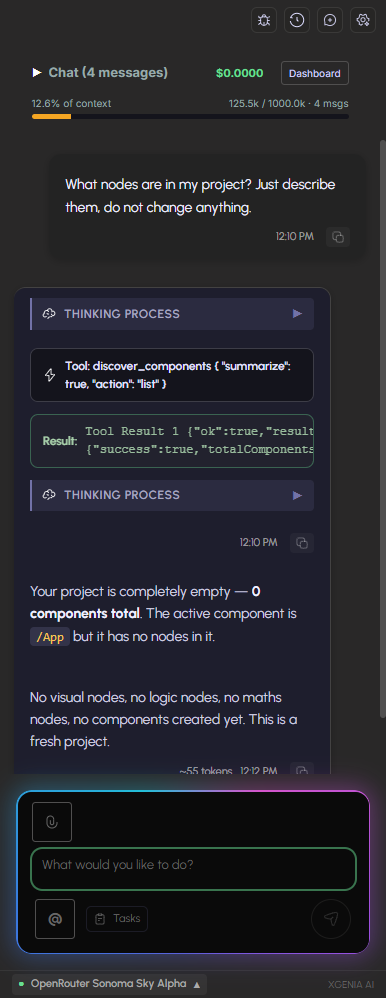
Three things to read in that reply:
The context bar appeared at the top. It shows the conversation name and message count, the running cost, a Dashboard toggle, and a bar for how full the model's context is — here 12.6% of context · 125.5k / 1000.0k · 4 msgs. Watch this over a long build. When it fills, start a new conversation.
A THINKING PROCESS block. Collapsed by default, it holds the actual tool calls and their results — in this case discover_components { "summarize": true, "action": "list" } and the raw result. Expand it whenever you want to know what the AI really did rather than what it says it did.
The answer itself. "Your project is completely empty — 0 components total. The active component is /App but it has no nodes in it." That is the AI reading your live graph, not guessing. If this reply is wrong about your project, fix that before building anything.
Step 8 — Scaffold the structure
Ask for the shape of the app before any detail.
Scaffold a slot game: a Home screen with a Play button, a Game screen,
and a Settings screen, with navigation between them and a shared TopBar.
For anything non-trivial the AI writes a plan first. Click Tasks to watch it.
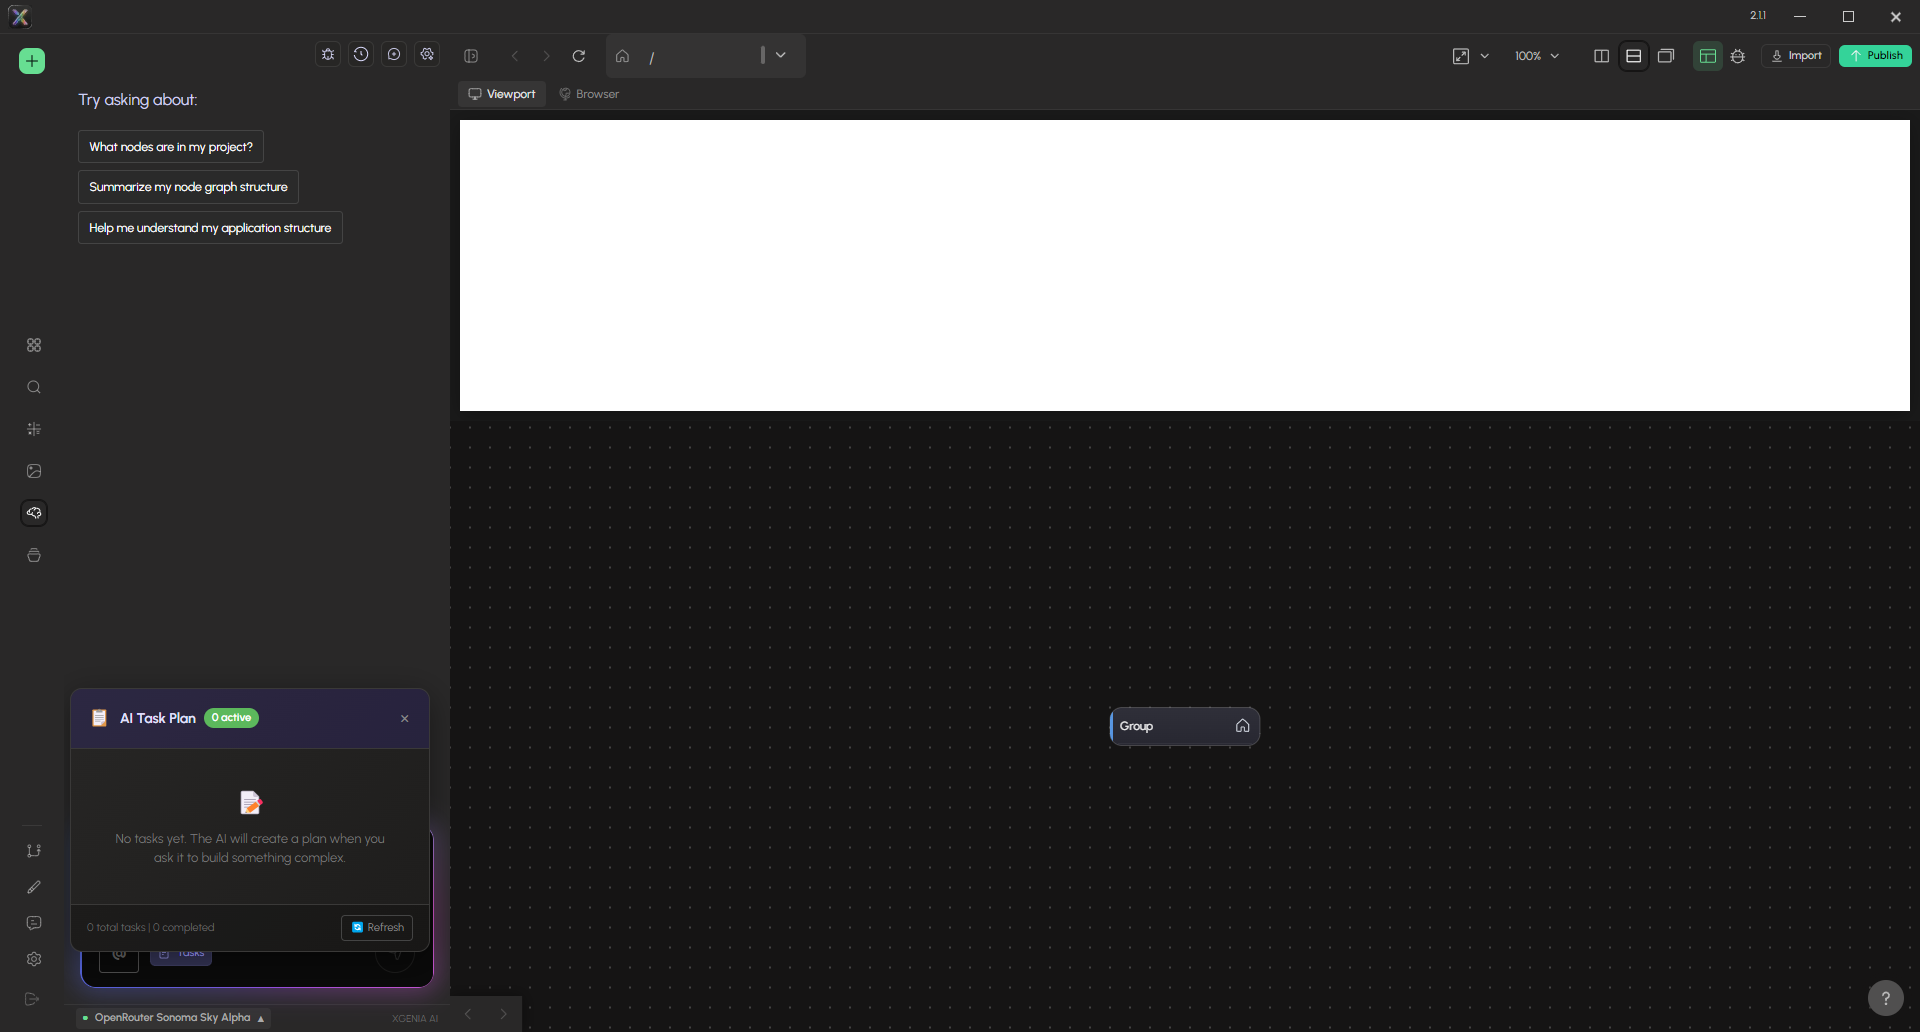
The AI Task Plan panel refreshes live and marks each item as pending, in progress, completed or cancelled, with a total/completed count at the bottom. On an empty project it tells you plainly that no tasks exist yet — the AI creates a plan when you ask it to build something complex.
This panel is the fastest way to see whether a long build is still on track, or whether it quietly dropped half of what you asked for.
Step 9 — Build the screens
Work one screen at a time. Compound requests are where plans drift.
On the Game page, build the HUD: balance on the left, bet amount in
the middle, and a spin button on the right. Full width, 72px tall.
Two accelerators worth forming a habit around:
- Show a mockup. Drag an image onto the input, or paste a screenshot with Ctrl+V, and say "build this". Far faster than describing a layout in words.
- Point with
@. Type@to mention a specific node, so there is no ambiguity about which "Button" you mean.
You can switch models mid-conversation without opening settings — click the model name at the bottom of the panel for your recent models, or View All Models… for the full picker.
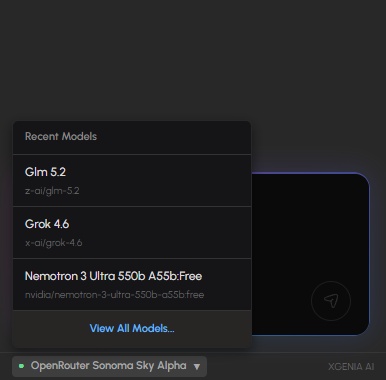
Use a cheap model for questions and a strong one for building; the quick menu makes the swap a single click.
Step 10 — Wire the logic
Describe behaviour as an outcome, not as a node recipe.
When Spin is pressed, disable the button, play the reel animation,
then re-enable it when the animation finishes.
The AI places the logic nodes, connects the signals, and writes JavaScript function nodes where node logic would be clumsy.
When it wants to run a script against your project rather than just write one, it posts an approval card instead — the plain-language description of what it will do, the code itself, and Run / Cancel.
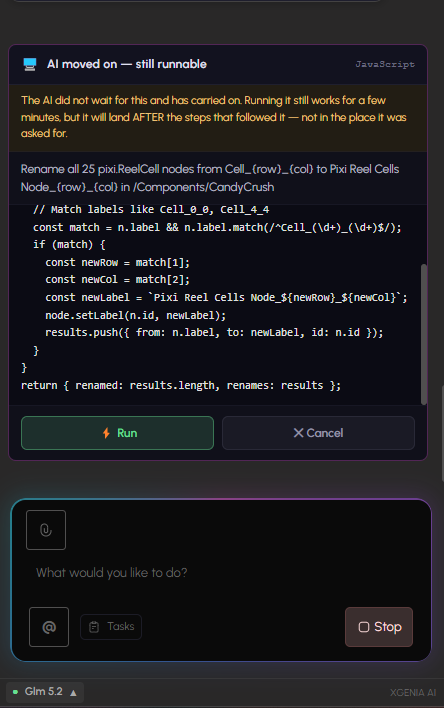
Deal with these while they are on screen. The AI does not wait for you — it carries on, and the card expires after about three minutes. If you already know the pattern you want — "use a state manager for this" — say so, and it will.
Afterwards you can ask it to explain itself: "trace what happens when Spin fires". It walks the whole signal chain and tells you where each connection goes. That is worth doing on anything you did not watch it build.
Step 11 — Generate art and audio
With your Fal.ai key already saved (Step 5), pick your models on the Image AI tab.
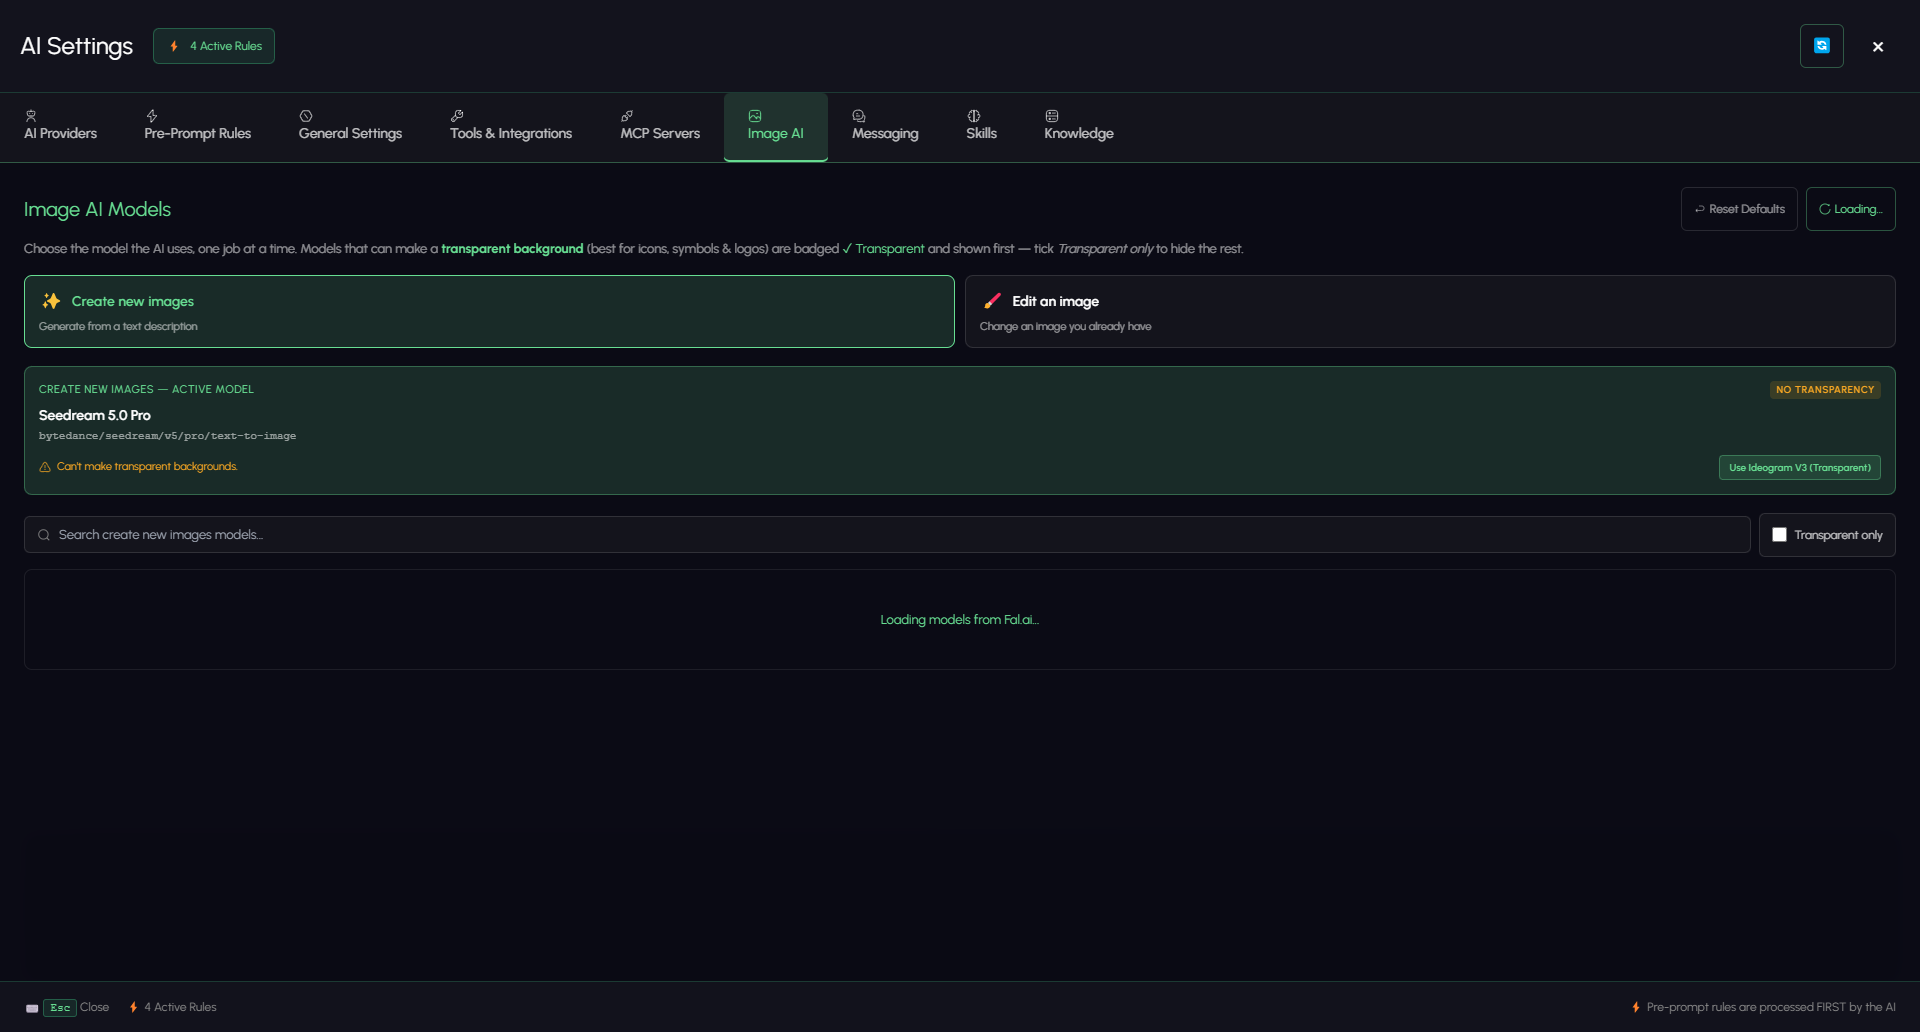
Models are organised by job, not category: Create new images (text → image) and Edit an image (image → image). One active model per job.
The tab is blunt about the trap that matters for game and UI assets: models that can produce a transparent background are badged Transparent and listed first, and if your active model cannot do transparency it says so and offers a one-click switch to one that can. Icons, symbols and sprites need alpha; find out here rather than after generating forty opaque coins.
Approving the key art
Generated key art arrives as a card showing the image, the prompt that made it, and three buttons: Approve, Request changes, Reject.
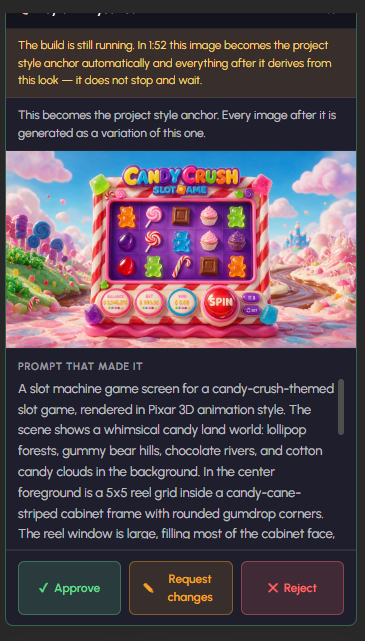
Request changes opens a revision editor with two ways in: describe the fix in words ("warmer light, drop the border") and let the AI rewrite the prompt, or edit the original prompt yourself.
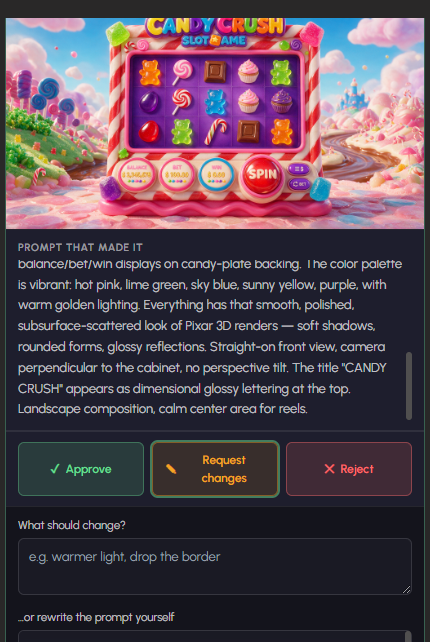
Read that card carefully, because it behaves differently from the code-approval gate: it is on a two-minute timer and the build keeps running. "In 1:52 this image becomes the project style anchor automatically and everything after it derives from this look — it does not stop and wait."
An approved key art becomes the project's style anchor: every later image is generated as a variation of it. Miss the timer on a mediocre first image and you have set the look of every asset that follows.
Step 12 — Finish assets in the Image Editor
Step 10 is generation inside the build loop — you ask, the AI generates, the AI places it. That is the right tool when the asset is a means to an end.
When the asset is the end — your key art, your character, the icon set the whole game is judged on — switch to the AI Image Editor, one icon above Chat in the left rail. It is a panel in its own right, not a step you have to reach through the chat, and despite the name it generates video and audio too.
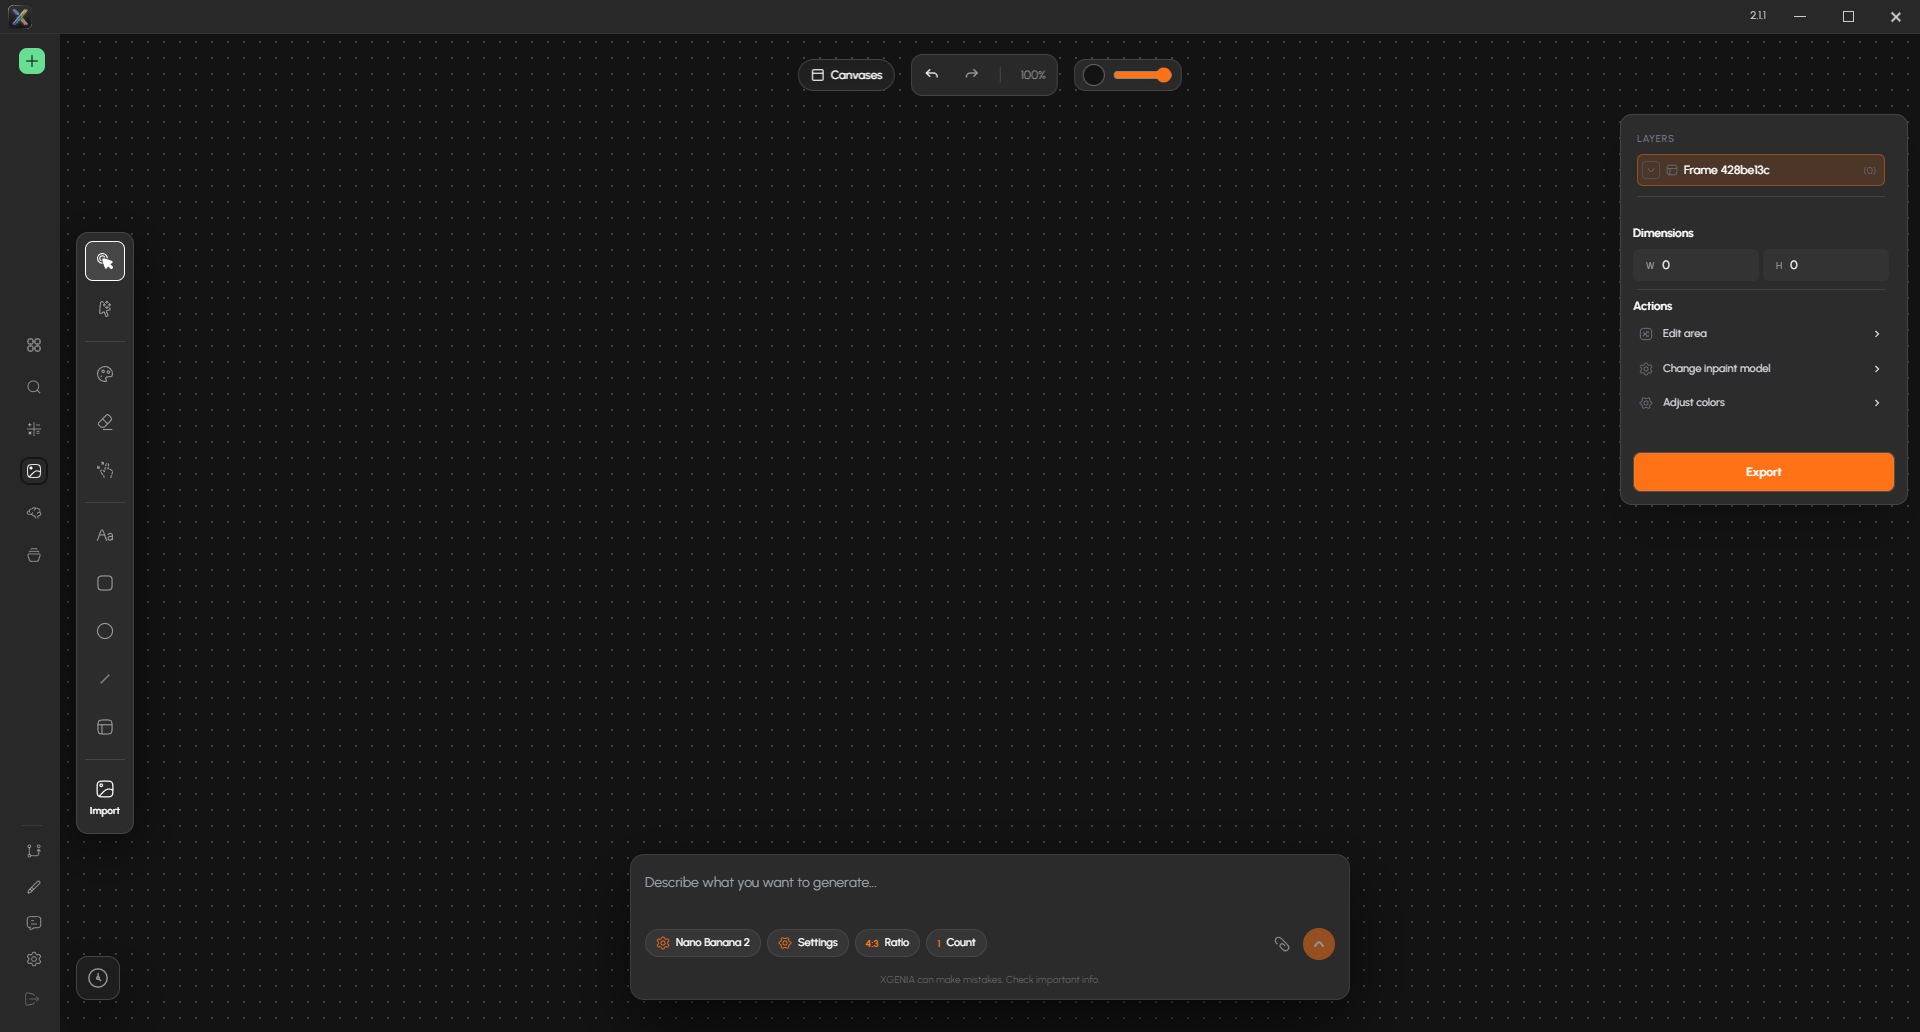
It is a real layered canvas, not a prompt box. Brush, eraser, marquee select, text, rectangle, ellipse, line, import — each with a keyboard shortcut — plus Layers, Dimensions, and an Export button, with the generation bar along the bottom.
Not right? Tell the AI to change it — you do not have to redraw anything
This is the part worth emphasising: the Image Editor is not a manual retouching tool you fall back to when the AI fails. It is where you keep asking the AI for changes, on an image that already exists, until it is right.
Select the image and type what is wrong into the prompt bar at the bottom. The selected image attaches itself as a reference, so the model is editing what is there, not generating something new and hoping it matches.
| The problem | What you do |
|---|---|
| The whole look is off | Say what to change in the prompt bar and regenerate from the current image |
| One region is wrong — a hand, a button, a face | Edit area: mask just that part and prompt. Only the mask changes; the rest of the picture is untouched. Hold Alt to carve a hole in the mask |
| Too small / too soft | Crisp upscale (keeps what is there) or Creative upscale (lets the model add detail) |
| It has a background and you need alpha | Remove background — no need to regenerate on a transparent-capable model |
| Colours clash with your palette | Adjust colors on the layer |
| It needs to be an exact size | Type it into Dimensions. An icon that must be 512×512 is a number, not a ratio you eyeball |
| The composition is fundamentally wrong | Block it out roughly with the shape tools and generate over it |
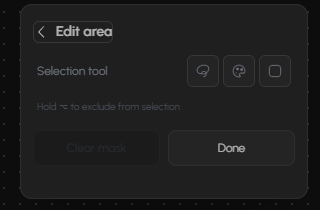
Every row of that table is an AI operation. You can run the entire refine loop — fix, check, fix again — without painting a single stroke by hand.
The brushes, shapes, text and the full paint engine are an option, not a requirement. They are there for two cases: you want to correct something by hand because it is faster than describing it, or you are an artist and would rather paint than prompt.
If you are neither, ignore that entire toolbar. Nothing in this guide needs it. The prompt bar, Edit area masking, and the one-click actions cover the whole workflow on their own.
Animate it — video and audio come out of the same box
Despite the name, the Image Editor is not limited to stills. Switch the model and the same prompt bar produces motion.
Open the model chip and pick from Image to Video — feed it the key art you just finished and describe the movement. That is how a static background becomes a looping scene, a character starts breathing, or a win celebration gets its animation. Text to Video generates a clip from a description alone.
The same applies to sound: Text to Audio for music and effects, Text to Speech for voice.
So the sequence for a piece of game art is one continuous loop in one panel: generate the still → fix it with prompts and masks → upscale it → animate it → export it.
Import works on your project, not your filesystem
Import (I) does not open a file dialog. It opens Select Project Image — a grid of the assets already in your XGENIA project.
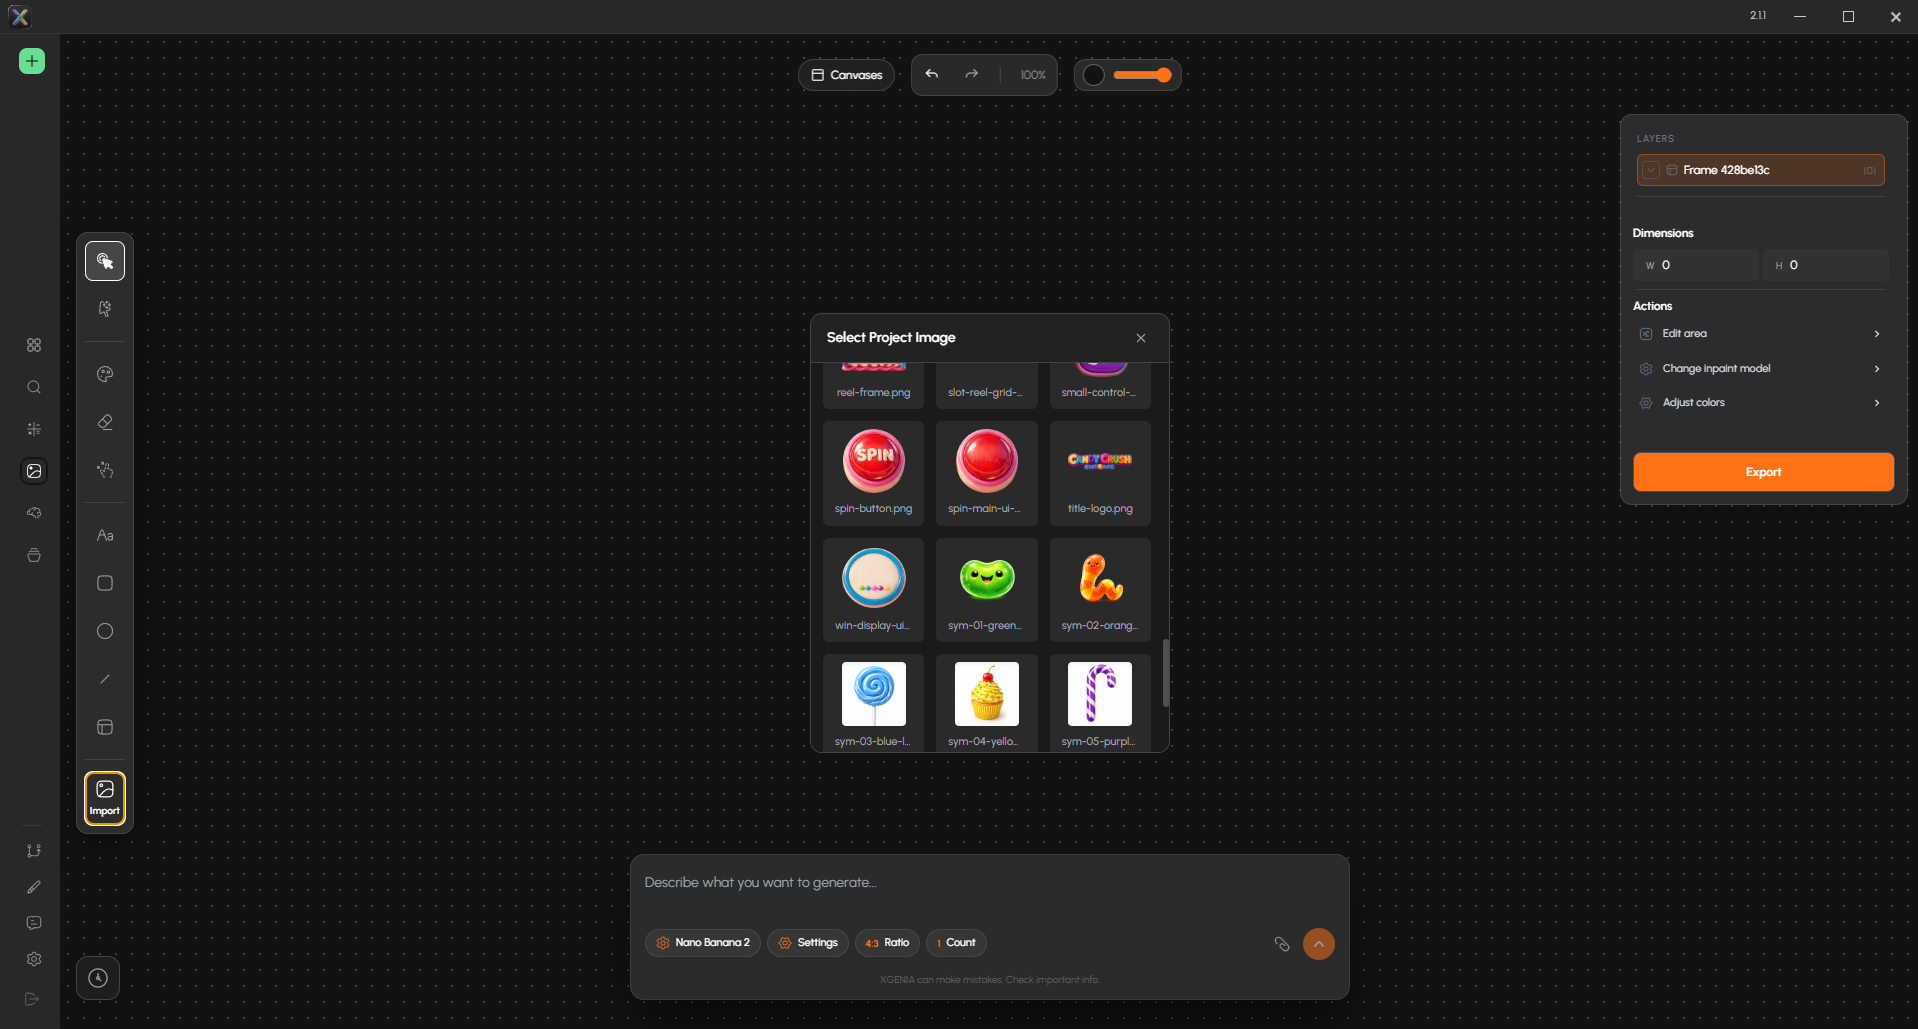
So fixing an icon that is already in your game is two clicks, not an export–edit–reimport round trip. The imported image also attaches to the prompt bar as a reference, so the next generation can work from it.
Select a layer with an image in it and the Actions list grows from three entries to seven: Crisp upscale, Creative upscale, Remove background and Vectorize join the masking tools. Remove background is the escape hatch when you generated a good asset on a model that cannot do transparency — cut the background rather than regenerate.
Double-click the image on the canvas and you land in the Layer editor, which has two modes.
It opens on Objects: an AI decomposition that finds the separate things inside a flat generated image so you can edit one of them instead of the whole frame. Optionally tell it what you want — "export only the UI buttons, each its own layer" — set how many regions to aim for, and run it (~$0.05).
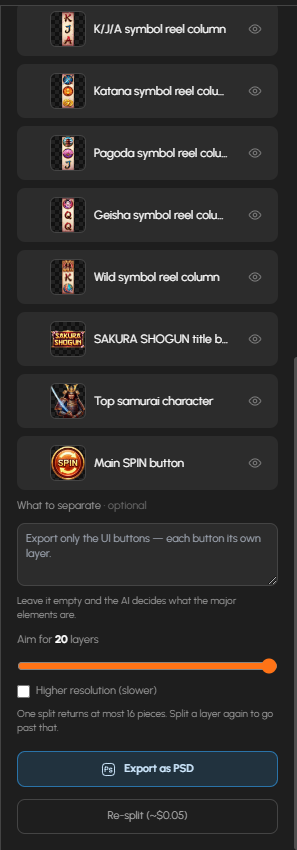
Once split, every object gets a descriptive name and an eye toggle — Top samurai character, Main SPIN button, Geisha symbol reel column — and you can Export as PSD: a layered Photoshop file with those names intact. That is how a generated slot screen becomes a set of assets a designer can finish or a game can load separately. Walkthrough: Export to PSD.
One caveat worth planning around: a split is bound to the exact image it was made from. Edit the picture afterwards and the split is dropped and must be paid for again — so finish the art first, split last, and export straight away.
Click Paint and it becomes a real paint engine — this is the artist's route, and you can skip it entirely. A mixing palette you actually mix on, brush families (sketching, inking, watercolour, charcoal, airbrushing), your own stack of paint layers with blend modes, and a wet-media surface simulation with relief, gloss, staining, granulation and drying.
It is a proper tool rather than a token brush, so if you can paint, painting is available. If you cannot, the AI route above gets you to the same place. Brushwork is flattened and wet paint sets after a few seconds, so blend while it is live and use Save to canvas or lose it.
The Model Hub
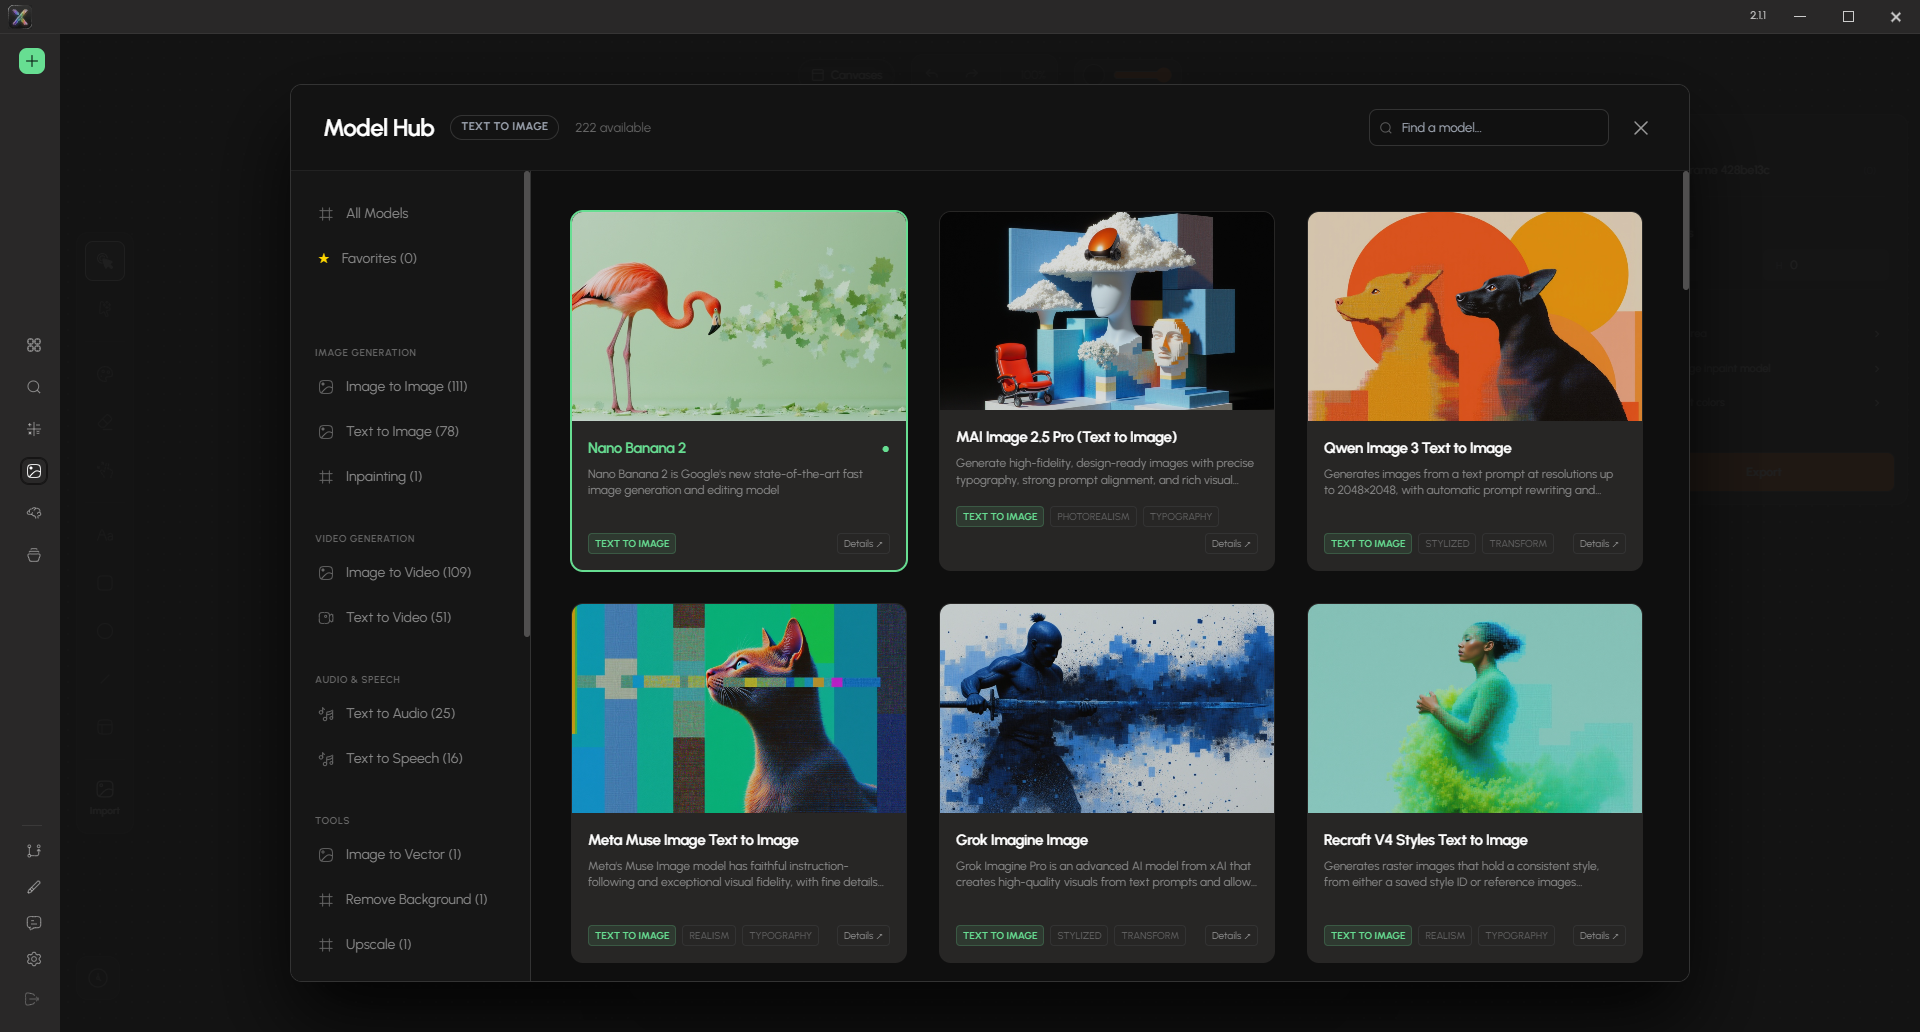
Click the model chip in the prompt bar. Several hundred models, grouped by what they do:
| Group | Categories |
|---|---|
| Image generation | Image to Image, Text to Image, Inpainting |
| Video generation | Image to Video, Text to Video |
| Audio & speech | Text to Audio, Text to Speech |
| Tools | Image to Vector, Remove Background, Upscale |
The Image to Image group is the largest, which tells you what this editor is really for: changing pictures you already have.
Read the badges rather than the descriptions. If your asset has text in it, a model without TYPOGRAPHY will fight you no matter how carefully you prompt. Favorites keeps the handful you actually use one click away.
Settings holds aspect ratio, an Enable Web Search toggle for subjects the model may not know, and an experimental generation limit. Count generates several variations at once — worth it while you are still finding the look, wasteful once you know it.
Keep the work
Open Canvases and turn on Sync to Repository — write changes to file system for Git. Art that lives only in the editor's memory is not in your repository, not on your teammates' machines, and not in any commit you can roll back to.
The History panel (clock icon, bottom-left) records every generation. It earns its keep on the fifth variation, when the version you liked was three prompts ago and you cannot remember the wording.
Full detail: AI Image Editor.
Step 13 — Make it verify itself
This is the step people skip, and the one that makes AI building trustworthy.
Open the preview, click through the whole flow, screenshot each screen,
and tell me anything that looks wrong.
The AI can drive a browser preview: navigate, click, type, read the console, and screenshot. The vision sub-agent then reviews those screenshots independently. When it disagrees with what the main model reported, the panel draws a warning banner above the reply — written by the chat UI, not by the AI. When the banner and the prose disagree, believe the banner: it is the one that looked.
Step 14 — Checkpoint as you go
XGENIA has Git built in, and the AI can use it.
Commit this as "HUD complete" before we start on the paytable.
Checkpoint before every risky change. It is the cheapest insurance available and it beats hunting through undo history after a build goes sideways. There is a starter skill for exactly this discipline — see below.
Step 15 — Deploy
Deploy this to Vercel.
The AI handles the deploy and reports the URL back. It can also set up a Supabase project, connect services, and inspect cloud functions. For slot projects it can create RGS games, extract maths, run RTP health checks, and produce certification reports — see XGENIA RGS.
Making the next session smarter
Two stores travel with your project, both git-friendly, both injected into every conversation.
Skills — how to do things
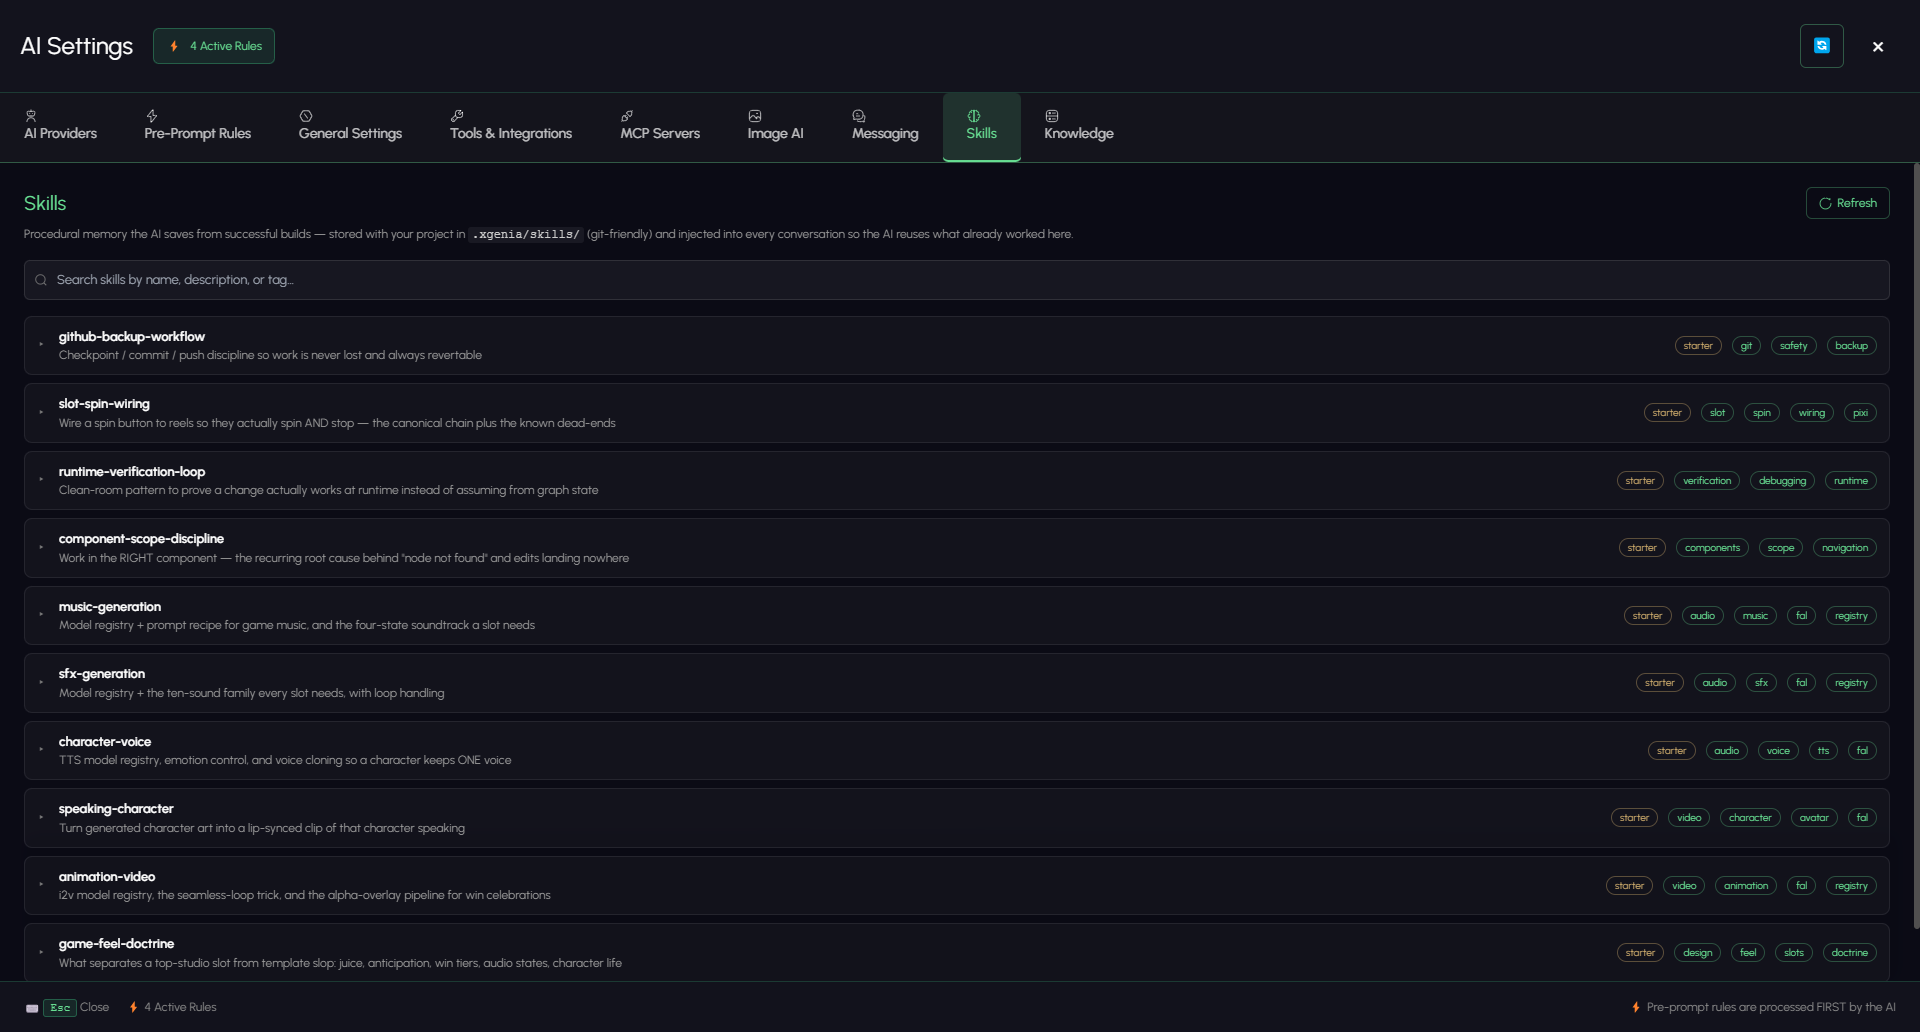
Procedural memory in .xgenia/skills/. XGENIA ships a set of starter skills covering the patterns that go wrong most often — checkpoint discipline, slot spin wiring, runtime verification, working in the right component, music and SFX generation, game feel.
Add your own after something works: "save what you just did as a skill called …". Save a project skill with the same name as a starter to override it.
Knowledge — what is true about this project
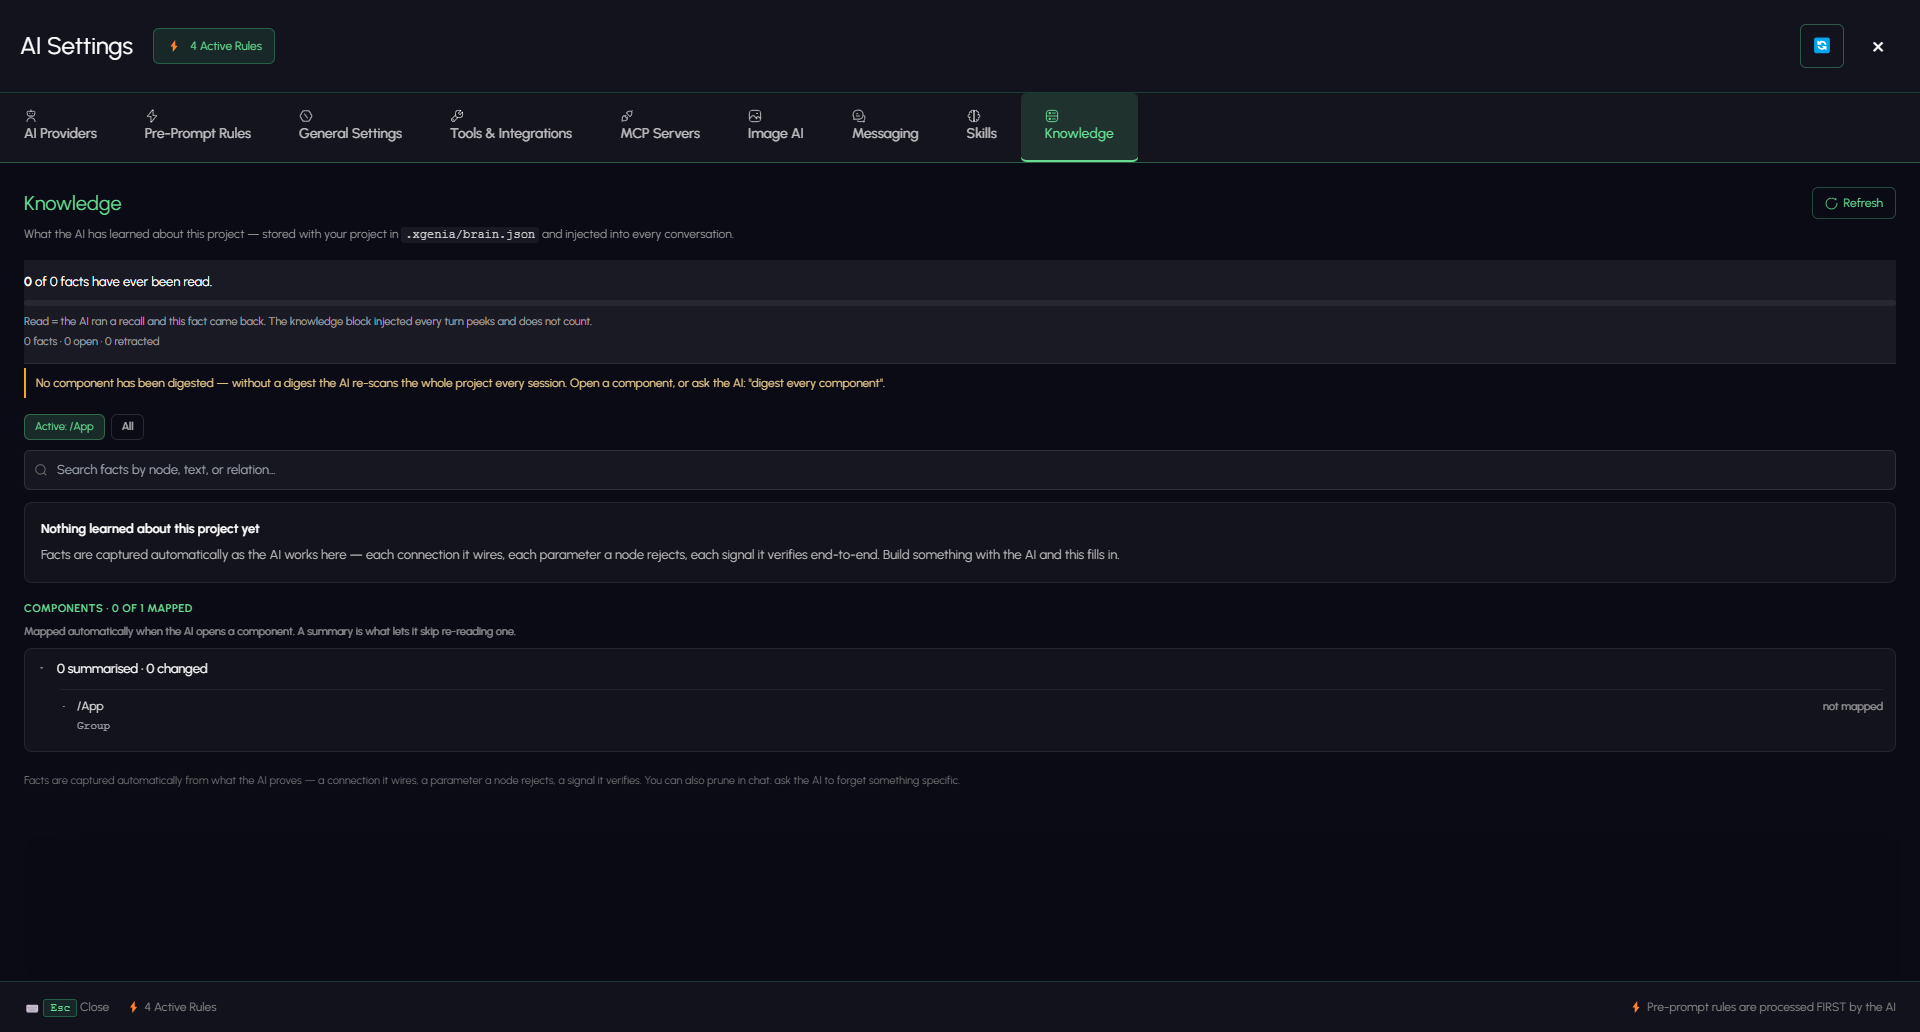
Facts in .xgenia/brain.json, captured automatically as the AI works — each connection it wires, each parameter a node rejects, each signal it verifies end to end.
The panel is honest in a way most dashboards are not. It distinguishes facts that have been read back from facts merely stored, and warns you when no component has been digested: without a digest the AI re-scans the whole project every session. If you are paying for a full re-scan on every conversation, this tab is where you find out. The fix is one prompt: "digest every component".
What still needs you
Almost none of it is technical. The AI is fast, not autonomous — what it cannot do is decide what you want.
| Yours | Why |
|---|---|
| Approving code execution | Scripts post a Run / Cancel card — and expire after about three minutes if you ignore them |
| Approving key art | Two-minute timer, then it auto-approves and sets the visual direction for everything after it |
| Deciding the architecture | It will happily build a bad structure very quickly |
| Judging whether it looks right | Screenshots catch broken; they do not catch ugly |
| Knowing when to start fresh | Long conversations drift — new task, new conversation |
Prompting that works
| Do | Instead of |
|---|---|
| "In the Game component, make the spin button full width" | "Make the button bigger" |
| "The button should be disabled until both fields have text" | "Add a condition node" |
| "Take a screenshot and confirm before saying it's done" | Assuming it checked |
| One goal per message | A six-part request |
@-mention the node | "the second button" |
| "5 reels, 3 rows, symbols fall from the top" | "make it look like a slot game" |
When it goes wrong
| Symptom | What to do |
|---|---|
| Red dot on the model bar | No verified API key — re-open AI Providers and save it |
| It edits the wrong component | Tell it which component to switch to, or @-mention a node inside the right one |
| It claims work it did not do | Expand the THINKING PROCESS block and read the actual tool calls |
| It stops mid-build | Check the context bar — you may have filled the window. Start a new conversation |
| It keeps adding things you did not ask for | That is a Pre-Prompt Rule, not a per-message correction |
| A build goes badly wrong | Revert to your last Git checkpoint |
| A code approval card will not run | It expired. Approvals go stale after about three minutes — ask the AI to do the work again |
| Key art you did not want became the style anchor | The card auto-approves after two minutes. Reject the next one and regenerate; art already derived from it will need redoing |
| It cannot generate any images | No verified Fal.ai key — Tools & Integrations (Step 5). This looks like the AI being bad at art, but it is a missing key |
| It keeps choosing the same few fonts | No Google Fonts key — it is picking from 40, not thousands |
| A layer split vanished after you edited the image | Splits are bound to the exact image. Finish the art first, split last, export the PSD immediately |
| It asks what a component is every session | Nothing has been digested — ask it to "digest every component", then check the Knowledge tab |
Where to go next
| Next | What it covers |
|---|---|
| AI Agents — Getting Started | The setup steps above, in reference form |
| The Chat Panel | Every control, explained |
| What the AI Can Do | The full tool catalogue |
| Tools & Integrations | The Fal.ai and Google Fonts keys |
| AI Image Editor | The canvas, its tools, and the Model Hub |
| Export to PSD | Turning a flat generated image into a layered Photoshop file |
| Models & Providers | Model choice, sub-agents, routing |
| Pre-Prompt Rules | Standing instructions in depth |
| Skills & Knowledge | Project memory in depth |
| Workflow Overview | The manual route — for when you want to build something yourself |
| Fundamentals | Components, signals and structure — optional, but it makes your descriptions sharper |