Version control
XGENIA has Git built in. Every project folder is a normal Git repository, and the Version control panel in the editor's left sidebar covers the whole everyday flow: commit, push, pull, branch, merge — and publishing your project straight to GitHub.
Use version control to:
- Collaborate — share changes with team members and pull in theirs.
- Work in parallel — keep separate lines of work on branches and merge them later.
- Back up — every push stores your project on the remote.
Because the project is a plain Git repository, external tools work too: GitHub Desktop, the git command line, or any Git client.
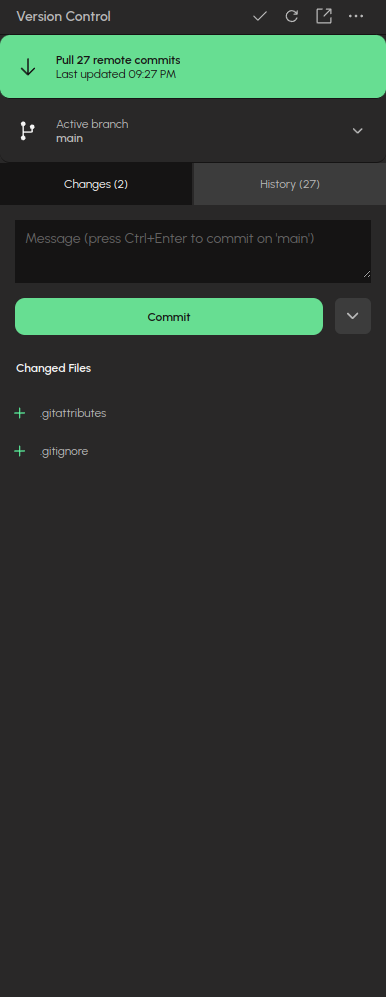
The panel for a project with a GitHub remote. Top to bottom: the header icons (commit, refresh, open on GitHub, ⋯ menu), the status button — here Pull 27 remote commits — the active branch, the Changes and History tabs, the commit message box and the Commit button with its dropdown, and the list of changed files.
Getting started
Open the Version control panel. If the project has no repository yet, you get two buttons:
- Initialize Repository — creates the repository and commits everything. Good if you only want local version control for now.
- Publish to GitHub — creates the repository and puts it on GitHub in one go.
Publishing to GitHub
Publish to GitHub creates a repository on your GitHub account and pushes the project to it. You will find it on the panel's start screen, on the status button at the top of the panel, and in the ⋯ menu.
- Sign in. Click Sign in with GitHub (opens your browser), or paste a personal access token instead. The token needs the
reposcope. - Fill in the details. Pick the Owner (your account or one of your organizations), check the Repository name (pre-filled from the project name), optionally add a description, and choose Private or Public. Private is the default.
- Click Publish repository.
That's it. The new repository becomes the project's remote, so from now on you push and pull directly from the panel. The token is stored encrypted with the project and reused for every push and pull.
If the project already has a remote, publishing replaces it with the new repository. The dialog warns you first.
Committing your changes
XGENIA saves your project to disk as you work, but a commit is a named snapshot you can go back to and share.
The Changes tab lists every component and file changed since the last commit. Click one to see exactly what changed, side by side.
To commit: type a message and press Commit — or press Ctrl+Enter (⌘Enter on Mac) in the message box. A message is required.
The arrow next to the Commit button offers variants:
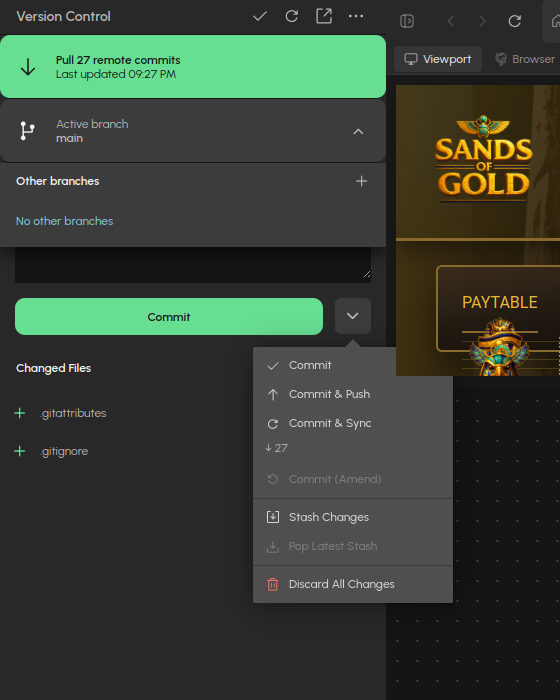
| Action | What it does |
|---|---|
| Commit & Push | Commit, then push it to the remote right away. |
| Commit & Sync | Commit, then pull and push in one go. |
| Commit (Amend) | Add your changes onto the latest commit instead of creating a new one. Only works while that commit has not been pushed. |
Pushing and pulling
The wide status button at the top of the panel tells you where you stand — and clicking it does the right thing:
| Button says | Meaning |
|---|---|
| Push N local commits | You have commits the remote doesn't. Click to push them. |
| Pull N remote commits | The remote has commits you don't. Click to pull them. |
| Sync Changes | Both. Click to pull first, then push. |
| Publish Branch | Your current branch doesn't exist on the remote yet. |
| Publish to GitHub | The project has no remote at all. |
| Up to date | Nothing to do. |
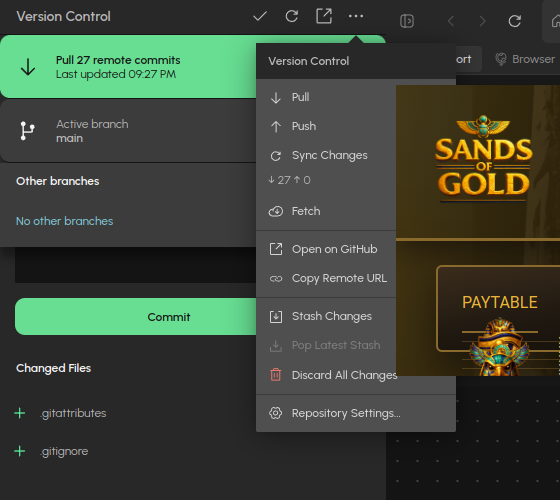
The same actions — plus Fetch, which checks the remote without changing anything — are in the ⋯ menu in the panel header, together with Open on GitHub, Copy Remote URL, the stash actions and Repository Settings….
Uncommitted local changes survive a pull: they are re-applied on top of what came in.
Push regularly — every time you finish a feature is a good rhythm. Anything pushed is safe even if your machine isn't.
History
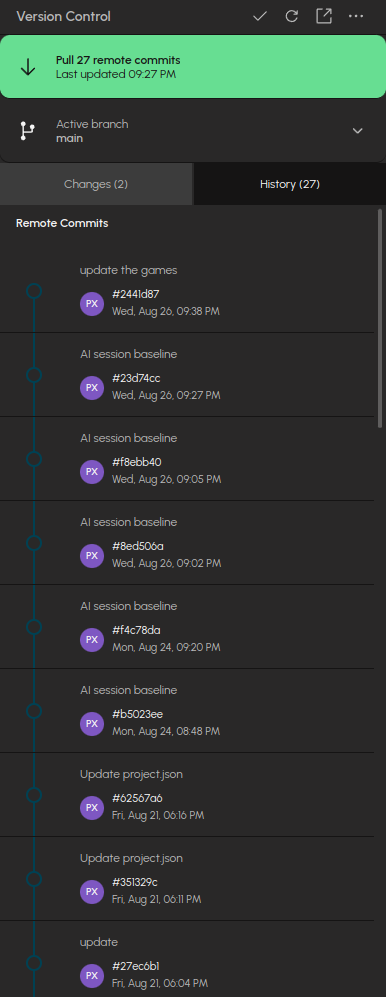
The History tab lists the commits on the current branch, newest first — message, author, short hash and date. Remote commits you have not pulled yet are listed under Remote Commits. Click a commit to see what it changed.
Conflicts
If you and a collaborator change the same thing — say, the same property on the same node — XGENIA can't pick a side for you. The panel switches to a conflict view where you resolve each conflict by keeping your version or taking theirs.
Branches
A branch is an independent line of work. Typical uses: a stable branch plus a development branch, a branch per feature, or branches for design variations you want to compare.
The branch button (just under the status button) shows the branch you are on. Click it to open the branch list:
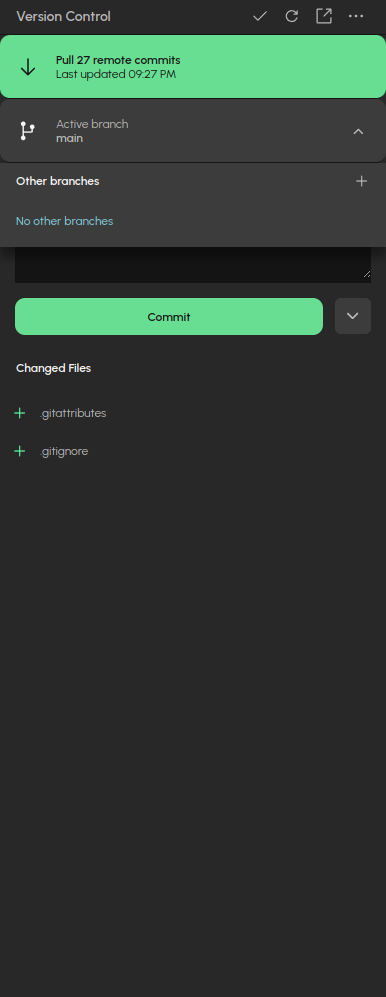
- Switch to a branch by clicking it. You need a clean working copy first — commit, discard, or stash your changes.
- Create a branch with the + action. Any uncommitted changes come along to the new branch.
- Each branch's menu offers Merge into ‹current branch›…, Copy branch name, and Delete.
Merging
Merging brings one branch's changes into another. Pick Merge into ‹current branch›… on the branch you want to merge in. XGENIA shows a preview of the combined result before you confirm.
The merge happens locally — push afterwards to share it.
Deleting a branch
Deleting a branch removes it locally and on the remote. Collaborators who have worked on it still have their own copy and can push it back. The main branch cannot be deleted.
Stashes
A stash shelves your uncommitted changes so you can get a clean working copy without committing — usually to switch branches.
- Stash Changes and Pop Latest Stash are in the Commit button's dropdown and in the ⋯ menu.
- Every stash is listed under Stashes on the Changes tab, where you can apply or delete it.
Discarding changes
Discard All Changes (Commit dropdown or ⋯ menu) throws away every uncommitted change permanently. If you might want the work back, stash it instead.
Repository settings
⋯ → Repository Settings… holds the plumbing:
- The remote URL the project pushes to and pulls from.
- The credentials used for it (for GitHub, a token).
- Your Git name and email, stamped on your commits.
Use this when you connect an existing remote by hand rather than through Publish to GitHub.
Working with collaborators
A collaborator joins by cloning the repository — with GitHub Desktop, git clone, or any Git tool — and opening the project folder in XGENIA. From there, everyone shares work by pushing and pulling.